Netty核心组件源码剖析 — ByteBuf

前言

在上一小节中,我们介绍channel,channel 的主要功能有处理网络IO读写,处理连接。这里需要注意的是channel仅仅是负责读写操作,在NIO中真正负责传输数据的是Buffer(缓冲区)。在NIO中,缓冲区的作用也是用来临时存储数据,可以理解为I/O数据的中转站。缓冲区直接对接channel,为其提供写入和读取的数据。通过操作buffer批量进行数据传输提高效率。在NIO中主要有八种缓冲区(ByteBuffer、CharBuffer、ShortBuffer,IntBuffer、LongBuffer、FloatBuffer、DoubleBuffer)。在网络中传输中,字节是基本单位,NIO使用的ByteBuffer作为Byte的字节容器,但是NIO中实现过于复杂,因此Netty又写了一套ByteBuf来代替NIO的ByteBuffer,这一小节我们将深入ByteBuf源码,探究ByteBuf底层原理与实现细节。

ByteBuffer 快速回顾

所有的缓冲区都有4个属性:capacitylimitpositionmark,并遵循:mark <= position <= limit <= capacity。

capactiy 容量,即可以容纳的最大数据量;在缓冲区创建时被设定并且不能改变。
limit 表示缓冲区的当前终点,不能对缓冲区超过极限的位置进行读写操作,且极限是可以修改的。
position 位置,下一个要被读或写的元素的索引,每次读写缓冲区数据都会改变该值,为下次读写做准备
mark 标记,调用mark()来设置mark=position,再次调用reset()可以让position恢复到标记的位置

实例化方法

ByteBuffer 是一个抽象类不能被实例化,ByteBuffer也提供了基础的构造方法,这些构造方法如下:

1
2
3
4
5
6
7
8
//java.nio.ByteBuffer#ByteBuffer(int, int, int, int, byte[], int)
ByteBuffer(int mark, int pos, int lim, int cap, // package-private
byte[] hb, int offset)
{
super(mark, pos, lim, cap);
this.hb = hb;
this.offset = offset;
}

这个构造方法中需要传入6个入参,除了我们上面介绍的4个参数,还有hb(heap buffer)和offset(偏移量)。同时ByteBuffer类提供了4个静态工厂方法来获得ByteBuffer的实例:

1
2
3
4
5
6
7
8
9
10
11
12
13
14
15
16
17
18
19
20
21
22
23
24
25
26
27
28
29
30
31
32
33
34
35
36
37
38
39
40
41
42
43
44
45
46
47
48
49
50
51
52
53
54
55
56
57
58
59
60
61
62
63
64
65
66
67
68
69
70
71
72
73
74
75
76
77
78
79
80
81
82
83
84
85
86
87
88
89
90
91
92
93
94
95
96
97
98
99
100
101
102
103
104
105
106
/**
* Allocates a new direct byte buffer.
*
* <p> The new buffer's position will be zero, its limit will be its
* capacity, its mark will be undefined, and each of its elements will be
* initialized to zero. Whether or not it has a
* {@link #hasArray backing array} is unspecified.
*
* @param capacity
* The new buffer's capacity, in bytes
*
* @return The new byte buffer
*
* @throws IllegalArgumentException
* If the <tt>capacity</tt> is a negative integer
*/
//java.nio.ByteBuffer#allocateDirect
public static ByteBuffer allocateDirect(int capacity) {
return new DirectByteBuffer(capacity);
}

/**
* Allocates a new byte buffer.
*
* <p> The new buffer's position will be zero, its limit will be its
* capacity, its mark will be undefined, and each of its elements will be
* initialized to zero. It will have a {@link #array backing array},
* and its {@link #arrayOffset array offset} will be zero.
*
* @param capacity
* The new buffer's capacity, in bytes
*
* @return The new byte buffer
*
* @throws IllegalArgumentException
* If the <tt>capacity</tt> is a negative integer
*/
//java.nio.ByteBuffer#allocate
public static ByteBuffer allocate(int capacity) {
if (capacity < 0)
throw new IllegalArgumentException();
return new HeapByteBuffer(capacity, capacity);
}

/**
* Wraps a byte array into a buffer.
*
* <p> The new buffer will be backed by the given byte array;
* that is, modifications to the buffer will cause the array to be modified
* and vice versa. The new buffer's capacity will be
* <tt>array.length</tt>, its position will be <tt>offset</tt>, its limit
* will be <tt>offset + length</tt>, and its mark will be undefined. Its
* {@link #array backing array} will be the given array, and
* its {@link #arrayOffset array offset} will be zero. </p>
*
* @param array
* The array that will back the new buffer
*
* @param offset
* The offset of the subarray to be used; must be non-negative and
* no larger than <tt>array.length</tt>. The new buffer's position
* will be set to this value.
*
* @param length
* The length of the subarray to be used;
* must be non-negative and no larger than
* <tt>array.length - offset</tt>.
* The new buffer's limit will be set to <tt>offset + length</tt>.
*
* @return The new byte buffer
*
* @throws IndexOutOfBoundsException
* If the preconditions on the <tt>offset</tt> and <tt>length</tt>
* parameters do not hold
*/
//java.nio.ByteBuffer#wrap(byte[], int, int)
public static ByteBuffer wrap(byte[] array,
int offset, int length)
{
try {
return new HeapByteBuffer(array, offset, length);
} catch (IllegalArgumentException x) {
throw new IndexOutOfBoundsException();
}
}

/**
* Wraps a byte array into a buffer.
*
* <p> The new buffer will be backed by the given byte array;
* that is, modifications to the buffer will cause the array to be modified
* and vice versa. The new buffer's capacity and limit will be
* <tt>array.length</tt>, its position will be zero, and its mark will be
* undefined. Its {@link #array backing array} will be the
* given array, and its {@link #arrayOffset array offset>} will
* be zero. </p>
*
* @param array
* The array that will back this buffer
*
* @return The new byte buffer
*/
//java.nio.ByteBuffer#wrap(byte[])
public static ByteBuffer wrap(byte[] array) {
return wrap(array, 0, array.length);
}

这4个构造方法描述如下:

  • allocateDirect(int capacity):不使用JVM堆栈而是通过操作系统来创建内存块用作缓冲区,它与当前操作系统能更好的耦合,因此能进一步提高I/O操作速度。但是分配直接缓冲区的系统开销很大,因此只有在缓冲区较大并长期存在或者需要经常重用时,才使用这种直接缓冲区。

  • allocate(int capacity):从堆空间中分配一个容量大小为capacity的byte数组作为缓冲区的byte数据存储器。

  • wrap(byte[] array)缓冲区的数据会存放在byte数组中,bytes数组或buff缓冲区任何一方中数据的改动都会影响另一方。其实ByteBuffer底层本来就是一个bytes数组负责来保存buffer缓冲区中的数据,通过allocate方法系统会帮你构造一个byte数组。

  • wrap(byte[] array, int offset, int length):在上一个方法的基础上可以指定偏移量和长度,这个offset也就是包装后byteBuffer的postion,length是limit-postion的大小,我们可以计算得出limit的位置为length+postion(offset)。

常用方法

byteBuffer提供了一些常用的方法,通过这些方法我们可以操作设置我们的buffer,也可以通过这些方法完成buffer的读写。这些方法的简单介绍如下:

  • limit(), limit(10):读取或者设置limit的值,并且4个基础属性都有这个方法。这两个方法一个get,一个set。

  • reset():把position设置成mark的值,相当于之前做过一个标记,现在要退回之前标记的地方。

  • clear()position=0;limit=capacity;mark=-1;将指针位置初始化,但是并不影响底层数据。

  • flip()limit=position;position=0;mark=-1;翻转,也就是让flip之后的position到limit这块区域变成之前的0到position这块,flip操作就是将一个准备写数据状态的缓冲区,变成一个准备读状态的缓冲区。

  • rewind():把postion设置为0,mark设置为-1,不改变limit的值。(从头开始。。)

  • remaining():return limit - position; 返回limit和position之间的相对位置差。

  • hasRemaining():return position < limit 返回是否还有未读内容。

  • compact():把从position到limit中的内容移到0到limit-position的区域,position和limit的取值也分别变成limit-position、capacity。如果先把position设置到limit,再compact,那么相当于clear。(把还没读的部分压缩到最前面。真“压缩”)

  • get():相对读,从position位置读取一个byte,并将position+1,为下次读写作准备。

  • get(int index):绝对读,读取byteBuffer底层的bytes中下标为index的byte,不改变position。

  • get(byte[] dst, int offset, int length):从position位置开始相对读,读length个byte,并写入dst下标从offset到offset+length的区域。

  • put(byte b):相对写,向position的位置写入一个byte,并将position + 1,为下次读写作准备。

  • put(int index,byte b):绝对写,向byteBuffer底层的bytes中下标为index的位置插入byte b,不改变postion。

ByteBuf 源码剖析

在网络传输中,字节是基础单位,NIO使用ByteBuffer作为Byte容器,前面我们也对其进行了简单的回顾,但是NIO的实现过于复杂,因此Netty写了一套Channel代替NIO的Channel,也写了一套ByteBuf代替NIO的ByteBuffer。和ByteBuffer一样。Netty实现的ByteBuf的子类也非常多,这里我们只针对ByteBuf进行详细的剖析。下图展示了ByteBuf的主要特性,图中列出的类都是在本小节中要重点梳理的类。其中前三个特性针对ByteBuffer的缺点进行了改进。

NIO ByteBuffer 只有一个位置指针position,在切换读写状态时,需要手动调用flip()方法或rewind()方法,已改变position的值,而且ByteBuffer的长度是固定的,一旦分配完成就不能再进行扩容和收缩,当需要放入对象大于ByteBuffer的容量时会发生异常。每次编码都要进行可写空间校验。Netty的AbstractByteBuf将读写指针分离,同时在写操作进行自动扩容。对其使用而言,无须关心底层实现,且操作简便、代码无冗余。NIO ByteBuffer的duplicate()方法可以复制对象,复制后的对象与原对象共享缓冲区的内存,但其position指针独立维护。Netty的ByteBuf也采用了这功能,并设计了内存池。内存池是由一定大小和数量的内存块ByteBuf组成的,这些内块的大小默认为16MB。当从Channel中读取数据时候,无需每次都分配新的ByteBuf,只需要从大的内存块中共享一份内存,并初始化其大小及独立维护读/写指针即可。Netty采用对象引用计数,需要手动回收。每复制一份ByteBuf或派生出新的ByteBuf,其引用都需要增加。

AbstractByteBuf 源码剖析

AbstractByteBuf是ByteBuf的子类,它定义了一些公共属性,如读索引、写索引、mark、最大容量等。AbstractByteBuf实现了一套读写操作的模版方法,其缓冲区真正的数据读写由其子类完成。AbstractByteBuf的核心功能如下,接下来我们对其的核心功能进行源码剖析。

1
2
3
4
5
6
7
8
9
10
11
12
13
14
15
// 读索引    
int readerIndex;
// 写索引
int writerIndex;
/**
* 标记读索引
* 在解码时,由于消息不完整,无法处理。
* 需要将 readerIndex 复位
* 此时需要给索引先做个标记
*/
private int markedReaderIndex;
// 标记读索引
private int markedWriterIndex;
// 最大容量
private int maxCapacity;

AbstractByteBuf的写操作 writeBytes()方法涉及扩容,在扩容时,除了合法的校验,还需要计算新的容量值,若内存大小为2的整数次幂,则AbstractByteBuf的子类比较好分配内存,因此扩容后的大小必须是2的整数次幂。具体代码解读如下:

1
2
3
4
5
6
7
8
9
10
11
12
13
14
15
16
17
18
19
20
21
22
23
24
25
26
27
28
29
30
31
32
33
34
35
36
37
38
39
40
41
42
43
44
45
46
47
48
49
50
51
52
53
54
55
56
57
58
59
60
61
62
63
64
65
66
67
68
69
70
71
72
73
74
75
76
77
78
79
80
81
82
83
84
85
86
87
88
89
90
91
92
93
//io.netty.buffer.AbstractByteBuf#writeBytes
@Override
public ByteBuf writeBytes(ByteBuf src, int srcIndex, int length) {
//确保可以写,当容量不足时自动扩容。
ensureWritable(length);
//缓冲区真正的写操作由子类实现
setBytes(writerIndex, src, srcIndex, length);
//调整写索引
writerIndex += length;
return this;
}

//io.netty.buffer.AbstractByteBuf#ensureWritable0
final void ensureWritable0(int minWritableBytes) {
//获取ByteBuf对象的引用计数
// 确认当前写入后的大小要小于总容量,并确保可以访问。
final int writerIndex = writerIndex();
final int targetCapacity = writerIndex + minWritableBytes;
// using non-short-circuit & to reduce branching - this is a hot path and targetCapacity should rarely overflow
if (targetCapacity >= 0 & targetCapacity <= capacity()) {
ensureAccessible();
return;
}
// 如果需要校验边界,并且当前写入后的capacity小于0 或者写入后的capacity大于最大容量,抛出异常
if (checkBounds && (targetCapacity < 0 || targetCapacity > maxCapacity)) {
ensureAccessible();
throw new IndexOutOfBoundsException(String.format(
"writerIndex(%d) + minWritableBytes(%d) exceeds maxCapacity(%d): %s",
writerIndex, minWritableBytes, maxCapacity, this));
}

// 自动扩容
// maxFastWritableBytes: 返回不用复制和重新分配的最快、最大可写字节数。
// 如果当前最大可写字节数 >= 要写入的字节数,直接返回当前写索引位置 + 最大可写字节数,
// 否则就要调用calculateNewCapacity计算出扩容后的大小。
// Normalize the target capacity to the power of 2.
final int fastWritable = maxFastWritableBytes();
int newCapacity = fastWritable >= minWritableBytes ? writerIndex + fastWritable
: alloc().calculateNewCapacity(targetCapacity, maxCapacity);

// 调整容量为最新的容量大小。
// Adjust to the new capacity.
capacity(newCapacity);
}

//io.netty.buffer.AbstractByteBufAllocator#calculateNewCapacity
// 当threshold小于阈值(4MB)时,新的容量(capacity)都是以64为基数向左移位计算出来的
// 然后通过位计算,得到下一个大于原容量且最接近的2次幂容量大小。
// 如果新的容量capacity大于阈值4MB的时候,不会以2倍的方式扩容,而是以 + threshold(4MB)的方式扩容。
@Override
public int calculateNewCapacity(int minNewCapacity, int maxCapacity) {
checkPositiveOrZero(minNewCapacity, "minNewCapacity");
if (minNewCapacity > maxCapacity) {
throw new IllegalArgumentException(String.format(
"minNewCapacity: %d (expected: not greater than maxCapacity(%d)",
minNewCapacity, maxCapacity));
}
final int threshold = CALCULATE_THRESHOLD; // 4 MiB page
// 如果新的容量等于阈值,直接返回。
if (minNewCapacity == threshold) {
return threshold;
}

//如果新的容量值大于4MB
// If over threshold, do not double but just increase by threshold.
if (minNewCapacity > threshold) {
// 先获取离minNewCapacity最近的4MB的整数倍数,且小于minNewCapacity
int newCapacity = minNewCapacity / threshold * threshold;
/**
* 次数新的容量值不会倍增,因为4MB以上内存比较大,
* 如果继续倍增,可能会带来额外的内存浪费
* 只能在此基础上+4MB,并判断是否大于maxCapacity
* 如果小于maxCapacity 返回 maxCapacity 否则返回newCapacity+threshold
**/
if (newCapacity > maxCapacity - threshold) {
newCapacity = maxCapacity;
} else {
newCapacity += threshold;
}
return newCapacity;
}

// 如果容量小于4MB,以64为基础倍增。
// 64 <= newCapacity is a power of 2 <= threshold
final int newCapacity = MathUtil.findNextPositivePowerOfTwo(Math.max(minNewCapacity, 64));
return Math.min(newCapacity, maxCapacity);
}

//io.netty.util.internal.MathUtil#findNextPositivePowerOfTwo
public static int findNextPositivePowerOfTwo(final int value) {
assert value > Integer.MIN_VALUE && value < 0x40000000;
return 1 << (32 - Integer.numberOfLeadingZeros(value - 1));
}

读操作 readBytes() 方法源码分析如下:

1
2
3
4
5
6
7
8
9
10
11
//io.netty.buffer.AbstractByteBuf#readBytes
@Override
public ByteBuf readBytes(byte[] dst, int dstIndex, int length) {
// 检测当前ByteBuf是否可读,检测其可读长度是否小于length
checkReadableBytes(length);
//和写一样,具体读由子类实现。
getBytes(readerIndex, dst, dstIndex, length);
//修改读索引位置。
readerIndex += length;
return this;
}

readBytes()方法调用getBytes()方法从当前的读索引开始,将length个字节复制到目标,byte数组中。由于不同的子类对应不同的复制操作,因此AbstractByteBuf中的getBytes()是一个抽象方法,留给子类实现。下面是一个具体子类PooledHeapByteBuf对getBytes()的实现。

1
2
3
4
5
6
7
8
9
//io.netty.buffer.PooledHeapByteBuf#getBytes
@Override
public final ByteBuf getBytes(int index, byte[] dst, int dstIndex, int length) {
// 检查目标数组是否够用,再检查ByteBuf的可读内容是否足够。
checkDstIndex(index, length, dstIndex, dst.length);
//将ByteBuf中的内容复制到dst数组中。
System.arraycopy(memory, idx(index), dst, dstIndex, length);
return this;
}

另一子类PooledDirectByteBuf对getBytes()方法的实现如下:

1
2
3
4
5
6
7
8
9
10
11
12
13
14
15
16
17
18
19
//io.netty.buffer.PooledDirectByteBuf#getBytes(int, byte[], int, int)
@Override
public ByteBuf getBytes(int index, byte[] dst, int dstIndex, int length) {
// 检查
checkDstIndex(index, length, dstIndex, dst.length);
// 将NIO的ByteBuffer中的内容获取到dst数组中。
_internalNioBuffer(index, length, true).get(dst, dstIndex, length);
return this;
}

final ByteBuffer _internalNioBuffer(int index, int length, boolean duplicate) {
// 根据readIndex获取偏移量offset
index = idx(index);
// 从memory中复制一份内存对象,两者共享缓存区,但其位置指针单独维护。
ByteBuffer buffer = duplicate ? newInternalNioBuffer(memory) : internalNioBuffer();
// 设置新的 byteBuffer位置及其最大长度。
buffer.limit(index + length).position(index);
return buffer;
}

通过上面的梳理,对AbstractByteBuf的核心部分已经有了一个大致的了解,下面通过对AbstractReferenceCountedByteBuf类进行深入剖析来了解Netty是如何运用引用计数法管理ByteBuf生命周期的。

AbstractReferenceCountedByteBuf 源码剖析

Netty在进行I/O读写时候使用了堆外内存,实现了零拷贝,堆外直接内存DirectBuffer的分配与回收效率都远远低于JVM堆内存上对象的创建与回收速率。Netty使用引用计数法来管理Buffer的引用与释放。Netty采用了内存池设计,先分配一块大内存,然后不断地重复利用这块内存。例如,当从SocketChannel 中读取数据时,先在大内存块中切一小部分来使用,由于与大内存共享缓存区,所以需要增加大内存的引用值,当用完小内存后,再将其放回发内存块中,同时减少其引用值。

运用到引用计数法的ByteBuf大部分都需要继承AbstractReferenceCountedByteBuf类,该类有一个引用值属性—refCnt,其大部分功能与此属性有关系。

由于ByteBuf操作可能存在多线程并发使用的情况,其refCnt属性的操作必须是线程安全的,因此采用了volatile 来修饰,以保证多线程可见。在Netty中,ByteBuf会被大量地创建,为了节省内存开销,通过AtomicIntegerFieldUpdater来更新refCnt的值,而没有采用AtomicInteger类型。因此AtomicInteger类型的创建的对象比int类型多占用16B的对象头,当有几十万或几百万ByteBuf对象时候,节约的内存可能有几十MB或几百MB。一下是AbstractReferenceCountedByteBuf的功能图。

AbstractReferenceCountedByteBuf的大部分功能都是由updater属性完成,其核心属性解读如下:

1
2
3
4
5
6
7
8
9
10
11
12
13
14
15
16
17
18
19
20
21
22
23
24
25
26
27
28
29
30
31
/**
* 调用Unsafe类的objectFieldOffset()方法
* 以获取某个字段相对于Jav对象的气势地址的偏移量
* Netty为了提高性能,构建了Unsafe对象
* 采用此偏移量访问ByteBuf的refCnt字段。
* 并未直接使用AtomicIntegerFieldUpdater
**/
private static final long REFCNT_FIELD_OFFSET =
ReferenceCountUpdater.getUnsafeOffset(AbstractReferenceCountedByteBuf.class, "refCnt");
// AtomicIntegerFieldUpdater 属性委托给ReferenceCountUpdater 来管理
// 主要用于更新和获取 refCnt 的值。
private static final AtomicIntegerFieldUpdater<AbstractReferenceCountedByteBuf> AIF_UPDATER =
AtomicIntegerFieldUpdater.newUpdater(AbstractReferenceCountedByteBuf.class, "refCnt");

// 引用计数值的实际管理者
private static final ReferenceCountUpdater<AbstractReferenceCountedByteBuf> updater =
new ReferenceCountUpdater<AbstractReferenceCountedByteBuf>() {
@Override
protected AtomicIntegerFieldUpdater<AbstractReferenceCountedByteBuf> updater() {
return AIF_UPDATER;
}
@Override
protected long unsafeOffset() {
return REFCNT_FIELD_OFFSET;
}
};

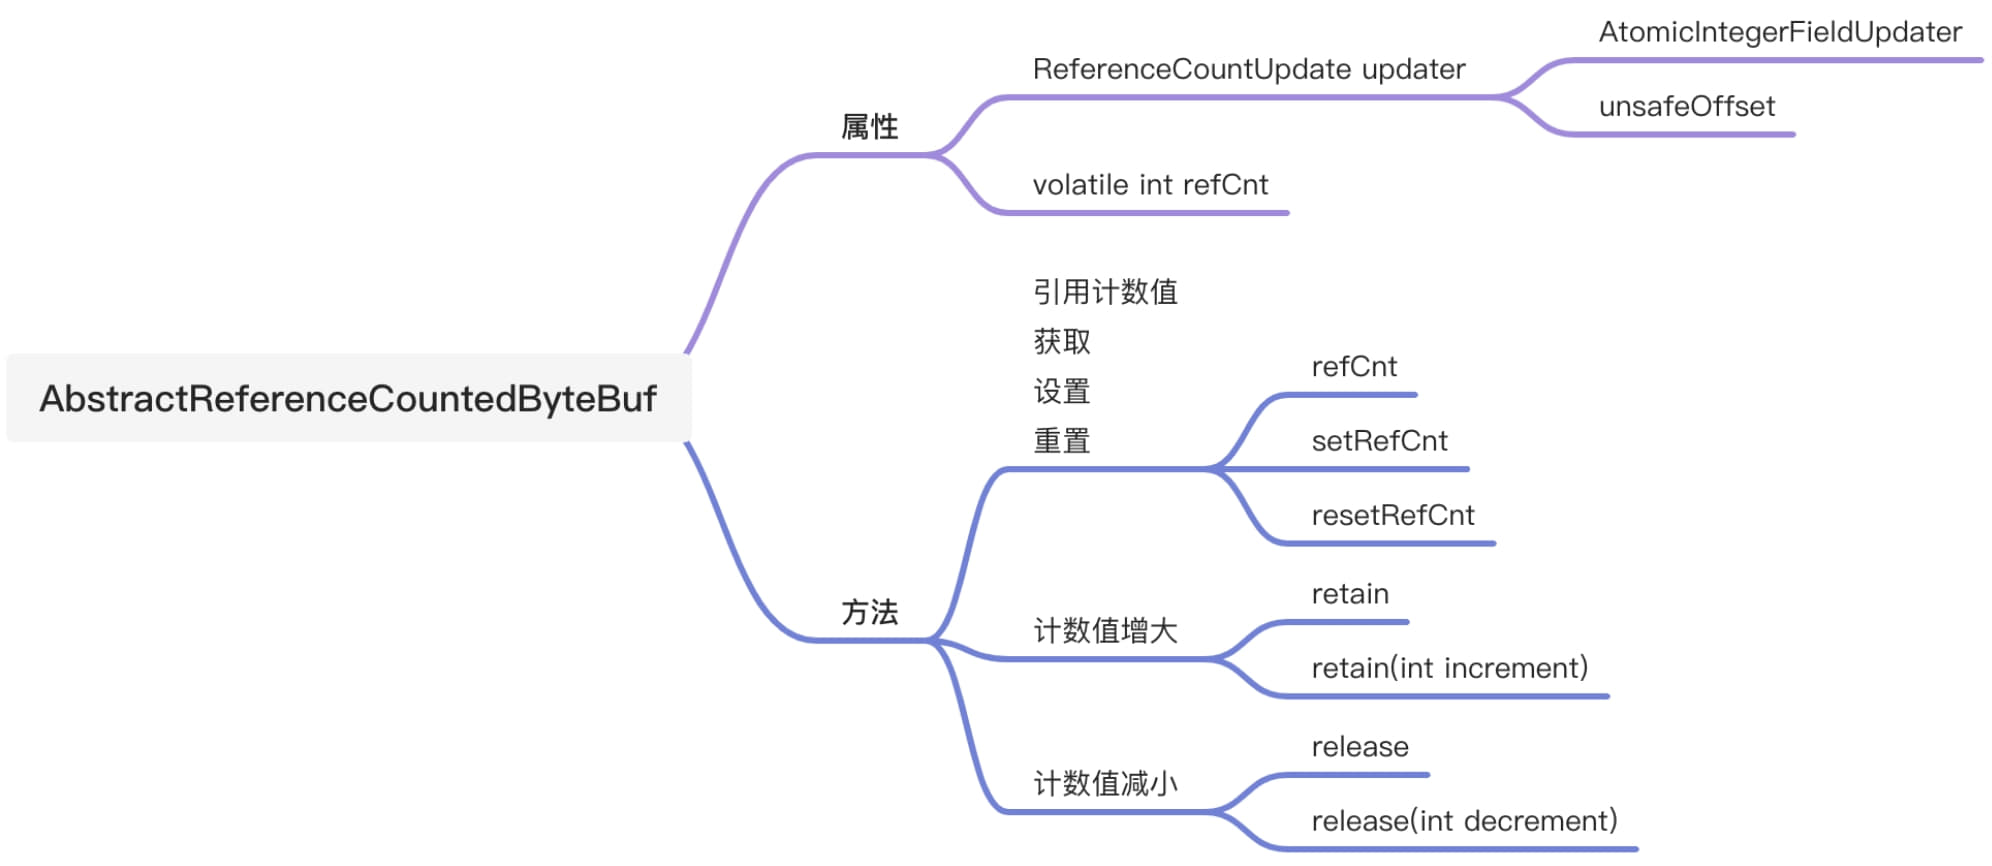
// 引用计数值,初始值为2,与调用refCnt()获取的实际值1有差别。
// Value might not equal "real" reference count, all access should be via the updater
@SuppressWarnings({"unused", "FieldMayBeFinal"})
private volatile int refCnt = updater.initialValue();

在旧的版本中,refCnt引用计数的值每次加1或减1,默认为1,大于0表示可用,等于0表示已释放。在Netty v4.1.38.Final版本中,refCnt的初始值为2,每次操作也不同。在下面源码剖析中会得到答案。

ReferenceCountUpdater 源码剖析

ReferenceCountUpdaterAbstractReferenceCountedByteBuf的辅助类,用于完成对引用计数制进行操作。虽然它的大部分功能都是和引用计数有关,但与Netty之前的版本相比有很大的改动,主要是Netty v4.1.38.Final 版本采用了乐观锁方式来修改refCnt,并在修改后进行校验。例如,retain()方法在增加了refCnt后,如果出现了溢出,则回滚并抛出异常。在旧版本中,采用的似乎原子性操作,不断地提前判断,并尝试调用compareAndSet。与之相比,新版本的吞吐量有所提高,但若还是采用refCnt的原有方式,从1开始每次加1或减1,则会引发一些问题,需要重新设计。这也是新版本改动较大的原因。一下是ReferenceCountUpdater的功能图。

由duplicate()、slice()衍生的ByteBuf与原生对象共享底层的Buffer,原对象的引用可能需要增加,引用增加的方法为retain0()。

retain() 剖析解读

retain0()方法为retain()方法的具体实现,其代码解析如下:

1
2
3
4
5
6
7
8
9
10
11
12
13
14
15
16
17
18
//io.netty.util.internal.ReferenceCountUpdater#retain0
private T retain0(T instance, final int increment, final int rawIncrement) {
//乐观锁,先获取原值,再增加。
int oldRef = updater().getAndAdd(instance, rawIncrement);
// 如果原值不为偶数,则表示ByteBuf已经被释放,无法继续引用。
if (oldRef != 2 && oldRef != 4 && (oldRef & 1) != 0) {
throw new IllegalReferenceCountException(0, increment);
}
// 如果增加后出现了溢出,回滚并抛出异常。
// don't pass 0!
if ((oldRef <= 0 && oldRef + rawIncrement >= 0)
|| (oldRef >= 0 && oldRef + rawIncrement < oldRef)) {
// overflow case
updater().getAndAdd(instance, -rawIncrement);
throw new IllegalReferenceCountException(realRefCnt(oldRef), increment);
}
return instance;
}

旧版本代码如下:

1
2
3
4
5
6
7
8
9
10
11
12
13
14
15
private ByteBuf retain0(int increment) {
for (;;) {
int refCnt = this.refCnt;
final int nextCnt = refCnt + increment;
// 先判断是否溢出
if(nextCnt <= increment) {
throw new IllegalReferenceCountException(refCnt, increment);
}
// 如果引用在for循环体中未被修改过,则用新的引用值替换。
if (refCntUpdater.compareAndSet(this, refCnt, nextCnt) {
break;
}
}
return this;
}

在进行引用计数的修改时,并不会先判断是否会出现溢出,而是先执行,执行完成之后再进行判断,如果溢出则进行回滚。在高并发情况下,与之前版本对比,Netty v4.1.38.Final的吞吐量会有明显的提升,但refCnt不是每次都进行加1或减1的操作,主要原因是修改前无法判断(因为场景没有加锁,所以修改前判断没有意义,可能正在修改时候已经不是判断时的值,还是会造成溢出。如果已经出现了溢出,再循环判断修改依旧没有意义了)。

release() 剖析解读

若有多条线程同时操作,则线程1调用ByteBuf的release()方法,线程2调用retain()方法,线程3调用release()方法,会导致ByteBuf出现多次销毁操作。若采用奇数表示销毁状态,偶数表示正常状态,则该问题得以解决,最终释放后会变成奇数。ByteBuf使用完后需要执行release()方法,release()方法的返回值为true或false,false表示还有引用存在,true表示无引用,此时会调用ByteBuf的deallocate()方法进行销毁。相关代码解读如下:

奇偶数表示不同状态的巧妙使用。

1
2
3
4
5
6
7
8
9
10
11
12
13
14
15
16
17
18
19
20
21
22
23
24
25
26
27
28
29
30
31
32
33
34
35
36
37
38
39
40
41
42
43
44
45
46
47
48
49
50
51
52
53
54
55
56
57
58
59
60
61
62
63
64
65
66
67
68
69
70
71
72
73
74
75
76
77
78
79
80
81
82
83
84
85
//io.netty.util.internal.ReferenceCountUpdater#release(T)
public final boolean release(T instance) {
// 获取到refCnt的值,因为我们refCnt的初始值是2,并且每次更新以2为步长,始终为偶数
// 如果此时获取到的rawCnt引用数为2,说明只有一个引用,
// 因此这里只要尝试最终更新(即将引用数更新为奇数即可)或是循环CAS减去一个引用也行,
// 如果还剩余多个引用即rawCnt不为2,调用nonFinalRelease0减去一个引用数即可。
int rawCnt = nonVolatileRawCnt(instance);
return rawCnt == 2 ? tryFinalRelease0(instance, 2) || retryRelease0(instance, 1)
: nonFinalRelease0(instance, 1, rawCnt, toLiveRealRefCnt(rawCnt, 1));
}

// 这段代码逻辑和上面的基本一致,只是这段代码可以传入减少多少个引用。
//io.netty.util.internal.ReferenceCountUpdater#release(T, int)
public final boolean release(T instance, int decrement) {
int rawCnt = nonVolatileRawCnt(instance);
int realCnt = toLiveRealRefCnt(rawCnt, checkPositive(decrement, "decrement"));
return decrement == realCnt ? tryFinalRelease0(instance, rawCnt) || retryRelease0(instance, decrement)
: nonFinalRelease0(instance, decrement, rawCnt, realCnt);
}

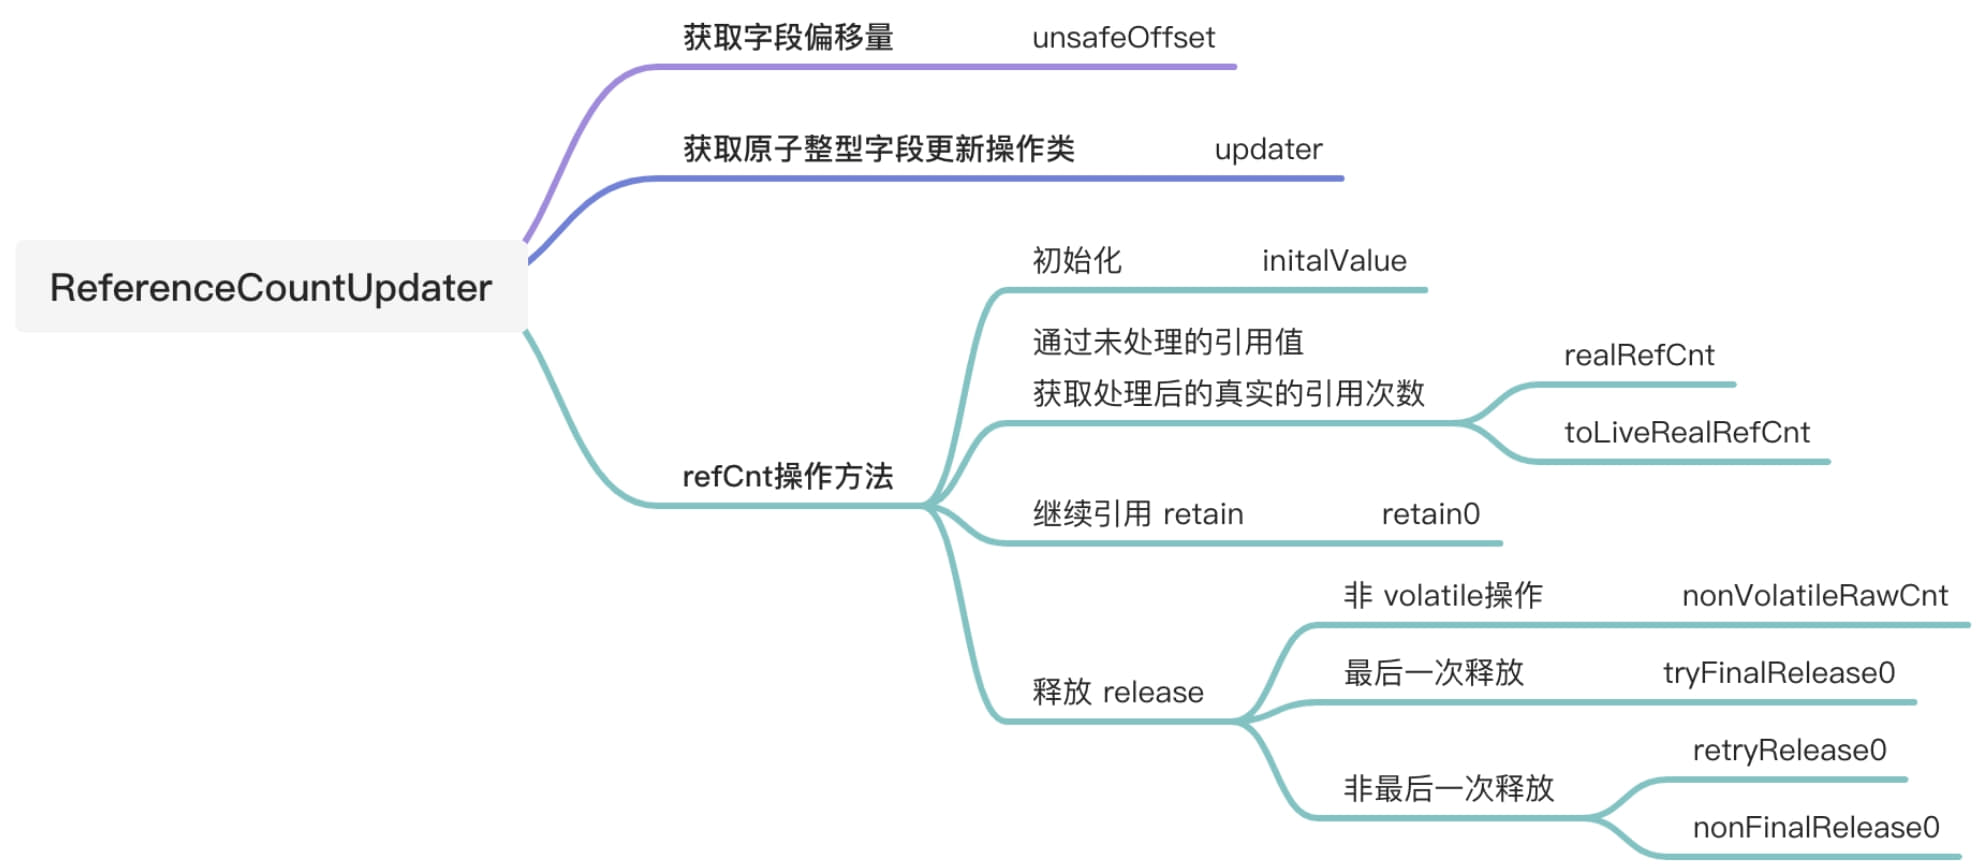
//尝试最终释放,得益于refCnt偶数有效,计数无效,realCnt = rawCnt >>> 1的机制,
// 设置refCnt为任意奇数,则表示当前被引用对象无效。
//io.netty.util.internal.ReferenceCountUpdater#tryFinalRelease0
private boolean tryFinalRelease0(T instance, int expectRawCnt) {
return updater().compareAndSet(instance, expectRawCnt, 1); // any odd number will work
}

// 非最终释放,如果减少的引用数,少于所有的引用数直接CAS进行操作,如果大于真正的引用数或CAS更新失败,
// 则直接调用retryRelease0进行循环更新
//io.netty.util.internal.ReferenceCountUpdater#nonFinalRelease0
private boolean nonFinalRelease0(T instance, int decrement, int rawCnt, int realCnt) {
if (decrement < realCnt
// all changes to the raw count are 2x the "real" change - overflow is OK
&& updater().compareAndSet(instance, rawCnt, rawCnt - (decrement << 1))) {
return false;
}
return retryRelease0(instance, decrement);
}

// 尝试进行释放,在这个方法里面是一个死循环,如果减去的引用数decrement是一个非常规的值,方法会直接异常退出,
// 如果decremnt的值和所有引用数相等,则会直接尝试最终释放(tryFinalRelease0),
// 方法会一直更新直至更新成功。
// 最后调用Thread.yield();让出线程执行权,增加在高并发竞争情况下的吞吐量。
//io.netty.util.internal.ReferenceCountUpdater#retryRelease0
private boolean retryRelease0(T instance, int decrement) {
for (;;) {
int rawCnt = updater().get(instance), realCnt = toLiveRealRefCnt(rawCnt, decrement);
if (decrement == realCnt) {
if (tryFinalRelease0(instance, rawCnt)) {
return true;
}
} else if (decrement < realCnt) {
// all changes to the raw count are 2x the "real" change
if (updater().compareAndSet(instance, rawCnt, rawCnt - (decrement << 1))) {
return false;
}
} else {
throw new IllegalReferenceCountException(realCnt, -decrement);
}
Thread.yield(); // this benefits throughput under high contention
}
}

//io.netty.util.internal.ReferenceCountUpdater#nonVolatileRawCnt
private int nonVolatileRawCnt(T instance) {
// 获取偏移量
// TODO: Once we compile against later versions of Java we can replace the Unsafe usage here by varhandles.
final long offset = unsafeOffset();
// 若偏移量正常,使用Unsafe的普通get
// 若偏移量获取异常,则选择Unsafe的volatile get
return offset != -1 ? PlatformDependent.getInt(instance, offset) : updater().get(instance);
}

// 计算真正的应用数量,即 rawCnt >>> 1,这里有一个判断
// rawCnt == 2 || rawCnt == 4 || (rawCnt & 1) == 0
// 即判断当前rawCnt是否为偶数,为什么不直接使用rawCnt & 1?
// 因为 == 相较于 & 有明显的性能优势。通过 == 操作进行判断路径的压缩。
//io.netty.util.internal.ReferenceCountUpdater#toLiveRealRefCnt
private static int toLiveRealRefCnt(int rawCnt, int decrement) {
if (rawCnt == 2 || rawCnt == 4 || (rawCnt & 1) == 0) {
return rawCnt >>> 1;
}
// odd rawCnt => already deallocated
throw new IllegalReferenceCountException(0, -decrement);
}

ReferenceCountUpdater 主要运用JDK的CAS来修改计数器,为了提高性能,还引入了Unsafe类,可直接操作内存。至此,ByteBuf的引用计数告一段落,下面会对Netty的另一种零拷贝方式组合缓冲区视图 CompositeByteBuf进行详细剖析。

CompositeByteBuf 源码剖析

CompositeByteByteBuf的主要功能是组合多个ByteBuf,对外提供统一的redaIndexwriteIndex。由于它只是将多个ByteBuf的实例组装到一起形成了一个统一的视图,并没有对ByteBuf中的数据进行拷贝,因此也属于Netty零拷贝的一种,主要应用与编解码。例如,将消息头和消息体两个ByteBuf组合到一块进行编码,可能会觉得Netty有写缓存区,其本身就会存在多个ByteBuf,此时只需把两个ByteBuf分别写入缓冲区 ChannelOutboundBuffer即可,没必要使用组合ByteBuf。但是在将ByteBuf写入缓存区之前,需要将整个消息进行编码解码,如消息长度,此时需要把两个ByteBuf合并成一个,无须额外处理接可以知道其整体长度,因此使用CompositeByteBuf是非常合适的。在解码时,由于Socket通信传输数据会产生粘和半包问题,因此需要一个读半包字节的容器,这个容器采用CompositeByteBuf比较合适。将每次从Socket中读取到的数据直接放入此容器中,少了一次数据拷贝。Netty的解码类ByteToMessageDecoder默认的读半包字节容器Cumulator未采用CompositeByteBuf,此时可在其子类中调用 setCumulator 进行修改。但需要注意的是,CompositeByteBuf 需要依赖使用场景。因为CompositeByteBuf使用了复杂的逻辑算法,所以其效率有可能比使用内存拷贝的低。

CompositeByteBuf内部定义了一个Component类型的集合,实际上,Component是ByteBuf的包装实现类,它聚合了ByteBuf对象并维护了ByteBuf对象在集合中的位置偏移信息等。下图展示了CompositeByteBuf功能。

在开始分析CompositeByteBuf之前,我们先来了解下它的基本结构和属性。

基本结构与属性

CompisteByteBuf中有两个重要的属性:

1
2
3
4
// 数组中存在component的个数。
private int componentCount;
// component 数组
private Component[] components;

CompositeByteBuf的大致结构如下图,里面有一个Component数组,Component里面放着缓冲区,还有各种索引。外部操作好像是只操作了CompositeByteBuf,其实具体操作Component中的缓冲区。

Component是CompositeByteBuf的核心组建,CompositeByteBuf也叫做组合ByteBuf,通过Component数组将多个ByteBuf合并成一个逻辑上一个BytBuf,避免了各个ByteBuf之间的相互拷贝,提高了整体的效率。想要深入理解CompositeByteBuf,Component是一个绕不开的对象,Component有以下一些属性:

1
2
3
4
5
6
7
8
9
10
11
12
13
14
15
16
17
18
19
20
21
22
23
final ByteBuf srcBuf; // 原始的buf,传进来是什么就是什么
final ByteBuf buf; // 去掉包装的后的buf,传进来的可能是包装之后的buf

int srcAdjustment; // 相对于srcBuf,CompoisteByteBuf的起始索引,读索引的偏移。
int adjustment; // 相对于buf,CompositeByteBuf的起始索引,读索引的偏移。

int offset; // 相对于CompositeByteBuf的起始索引。
int endOffset; //相对于CompositeByteBuf的结束缩影

private ByteBuf slice; // 缓存切片

//构造方法
//io.netty.buffer.CompositeByteBuf.Component#Component
Component(ByteBuf srcBuf, int srcOffset, ByteBuf buf, int bufOffset,
int offset, int len, ByteBuf slice) {
this.srcBuf = srcBuf;
this.srcAdjustment = srcOffset - offset;
this.buf = buf;
this.adjustment = bufOffset - offset;
this.offset = offset;
this.endOffset = offset + len;
this.slice = slice;
}

addComponent() 剖析解读

下面是关于addComponent()方法及相关方法的代码解读:

1
2
3
4
5
6
7
8
9
//io.netty.buffer.CompositeByteBuf#addComponent(boolean, int, io.netty.buffer.ByteBuf)
public CompositeByteBuf addComponent(boolean increaseWriterIndex, int cIndex, ByteBuf buffer) {
checkNotNull(buffer, "buffer");
// 把buffer加入Component数组中,并对数组中的元素进行相应的挪动
addComponent0(increaseWriterIndex, cIndex, buffer);
// 是否需要合成一个ByteBuf
consolidateIfNeeded();
return this;
}

在这里会调用一个addComponent0的方法,在这个方法中会先将传入的ByteBuf解掉包装,然后根据其读索引,可读长度和偏移量等信息封装成一个Component,然后添加到components数组中,在这个过程中还会涉及到对原有components数组的扩容移动等操作。

1
2
3
4
5
6
7
8
9
10
11
12
13
14
15
16
17
18
19
20
21
22
23
24
25
26
27
28
29
30
31
32
33
34
35
36
37
38
39
40
41
42
//io.netty.buffer.CompositeByteBuf#addComponent0
private int addComponent0(boolean increaseWriterIndex, int cIndex, ByteBuf buffer) {
assert buffer != null;
boolean wasAdded = false;
try {
// 校验component索引是否越界
checkComponentIndex(cIndex);

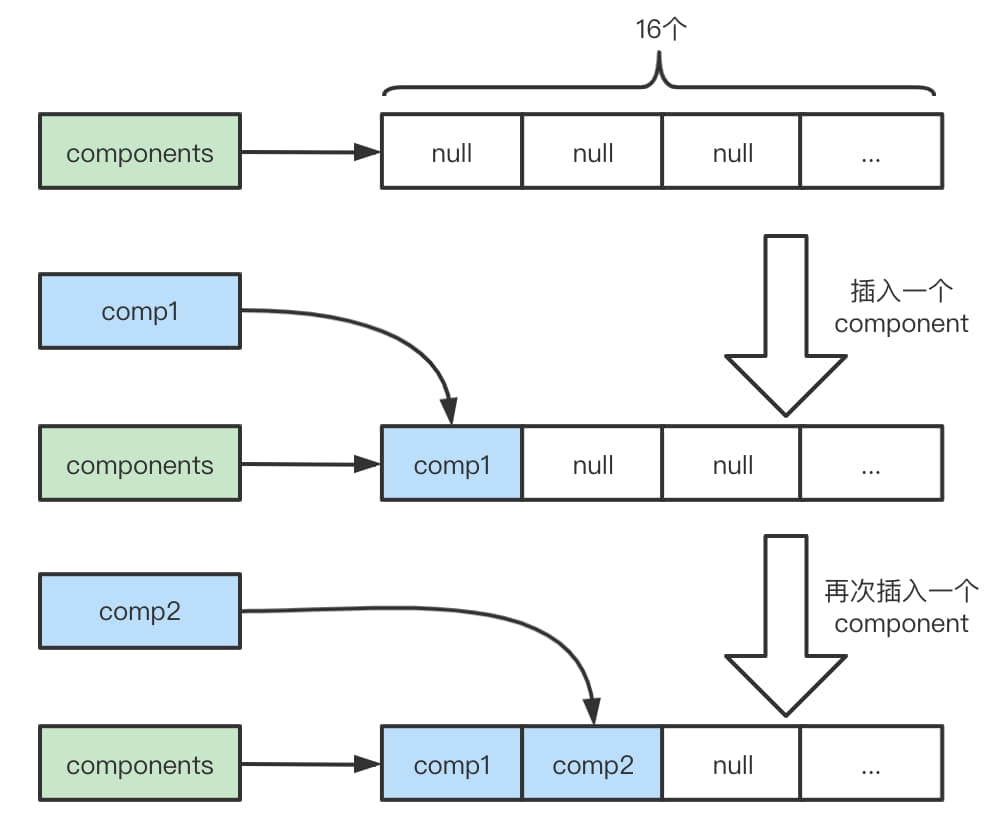
//创建一个新的Component,这里没有必要校验,直接加一个到Component的list中
// No need to consolidate - just add a component to the list.
Component c = newComponent(ensureAccessible(buffer), 0);
int readableBytes = c.length();

// 校验溢出
// Check if we would overflow.
// See https://github.com/netty/netty/issues/10194
checkForOverflow(capacity(), readableBytes);

//将创建的component加入到component数组中位于cIndex的位置上。
addComp(cIndex, c);
// 添加成功
wasAdded = true;
if (readableBytes > 0 && cIndex < componentCount - 1) {
// 插入位置在component数组中间,调整更新指针位置。
updateComponentOffsets(cIndex); // 调整Component的偏移量
} else if (cIndex > 0) {
// 插入索引不是第一个索引,且不是插入到中间。插入在最后。根据上一个
// endOffset进行一些索引调整
c.reposition(components[cIndex - 1].endOffset);
}
if (increaseWriterIndex) {
// 增加写索引
writerIndex += readableBytes;
}
return cIndex;
} finally {
if (!wasAdded) {
// 执行到这里说明插入异常,释放buffer
buffer.release();
}
}
}

newComponent()先获取源缓冲区buf的读索引和可读长度,然后将buf的包装去掉,获取去掉unwrapped的读索引unwrappedIndex,最后创建Component。

1
2
3
4
5
6
7
8
9
10
11
12
13
14
15
16
17
18
19
20
21
22
23
24
25
26
27
28
29
30
31
32
//io.netty.buffer.CompositeByteBuf#newComponent
@SuppressWarnings("deprecation")
private Component newComponent(final ByteBuf buf, final int offset) {
final int srcIndex = buf.readerIndex();
final int len = buf.readableBytes();

// unpeel any intermediate outer layers (UnreleasableByteBuf, LeakAwareByteBufs, SwappedByteBuf)
ByteBuf unwrapped = buf;
int unwrappedIndex = srcIndex;
while (unwrapped instanceof WrappedByteBuf || unwrapped instanceof SwappedByteBuf) {
unwrapped = unwrapped.unwrap();// 剥离外层,获取最原始的缓冲区
}

// unwrap if already sliced
if (unwrapped instanceof AbstractUnpooledSlicedByteBuf) {
unwrappedIndex += ((AbstractUnpooledSlicedByteBuf) unwrapped).idx(0);
unwrapped = unwrapped.unwrap();
} else if (unwrapped instanceof PooledSlicedByteBuf) {
unwrappedIndex += ((PooledSlicedByteBuf) unwrapped).adjustment;
unwrapped = unwrapped.unwrap();
} else if (unwrapped instanceof DuplicatedByteBuf || unwrapped instanceof PooledDuplicatedByteBuf) {
unwrapped = unwrapped.unwrap();
}

// We don't need to slice later to expose the internal component if the readable range
// is already the entire buffer
// 如果可读范围就是容量的话,就可以返回切片,合并后的缓冲去就会有切片
final ByteBuf slice = buf.capacity() == len ? buf : null;
// 大端
return new Component(buf.order(ByteOrder.BIG_ENDIAN), srcIndex,
unwrapped.order(ByteOrder.BIG_ENDIAN), unwrappedIndex, offset, len, slice);
}

addComp()这里就要将组建插入到数组相应的位置,默认当然是最后一个位置,也就是componentCount

1
2
3
4
5
//io.netty.buffer.CompositeByteBuf#addComp
private void addComp(int i, Component c) {
shiftComps(i, 1); // 移出索引处的位置,超出数组大小就要扩容。
components[i] = c; // 放入数组。
}

shiftComps() 插入新的component,可能是中间位置,那就需要腾出这个位置,也可能是最后,也可能要扩容。

1
2
3
4
5
6
7
8
9
10
11
12
13
14
15
16
17
18
19
20
21
22
23
24
25
26
27
28
29
30
31
//io.netty.buffer.CompositeByteBuf#shiftComps
private void shiftComps(int i, int count) {
final int size = componentCount, newSize = size + count;
assert i >= 0 && i <= size && count > 0;
if (newSize > components.length) {
// 需要扩容,扩到现有components个数的1.5倍,或者新数组size大小。
// grow the array
int newArrSize = Math.max(size + (size >> 1), newSize);
Component[] newArr; // 创建新数组
if (i == size) {
// 如果插入到最后,扩容到newArrSize, 然后把原来的拷贝过去,浅拷贝
newArr = Arrays.copyOf(components, newArrSize, Component[].class);
} else {
// 插入到中间,扩容且需要腾出索引位置。
newArr = new Component[newArrSize];
if (i > 0) {
// i索引之前的拷贝到newArr,从0索引到i,拷贝i个。
System.arraycopy(components, 0, newArr, 0, i);
}
if (i < size) {
// i索引之后的拷贝到newArr, 从i + cout索引到最后,拷贝size-i个
System.arraycopy(components, i, newArr, i + count, size - i);
}
}
components = newArr; // 新数组
} else if (i < size) {
//不需要扩容,只需要把i索引之后的往后count位。
System.arraycopy(components, i, components, i + count, size - i);
}
componentCount = newSize; // 更新components 个数。
}

扩容的大体逻辑如下:

  • 如果需要扩容,扩容大小是原来大小的1.5倍,如果插入是最后,那就直接扩容拷贝到新数组里,如果不是插入到中间的话,需要把前后的元素分别拷贝到新数组的位置上,留出要插入的索引的位置,最后插入。
  • 如果不进行扩容,默认插入位置就是最后,否则的话需要把位置所在元素以及后面的往后挪,把位置腾出来,插入数据。

要注意这里的数组拷贝全是浅拷贝Arrays.copyOfSystem.arraycopy只是拷贝引用。

以下几个图是插入的逻辑分析:

  • 插入到最后,无需扩容:

  • 扩容,插入到最后。

  • 插入到中间需要移动元素,再插入并且不进行扩容。

  • 插入到中间,并进行扩容。

updateComponentOffsets()如果是有可读数据,且插入在中间位置就需要更新位置以及后面的component的索引,因为被插队了,偏移就变了。

1
2
3
4
5
6
7
8
9
10
11
12
13
14
//io.netty.buffer.CompositeByteBuf#updateComponentOffsets
private void updateComponentOffsets(int cIndex) {
int size = componentCount;
if (size <= cIndex) {
return;
}
// 获取前一个组建的endOffset
int nextIndex = cIndex > 0 ? components[cIndex - 1].endOffset : 0;
for (; cIndex < size; cIndex++) { // 更新cIndex及之后的所有偏移。
Component c = components[cIndex];
c.reposition(nextIndex); // 根据前一个更新endOffset来更新偏移。
nextIndex = c.endOffset;
}
}

consolidateIfNeeded()这个方法就是合并操作,当components数组中的个数超过限制的最大个数时(默认16个),就会开始进行合并操作。实际的合并操作由consolidate0来完成。操作逻辑也比价简单。首先计算component的可读字节数,然后创建一个新buffer,然后循环遍历要合并的component并将他们转移到新的buffer中。最后把他们在原数组中移除,将新的buffer封装成一个新的component并重新加入到components数组中,同时更新索引偏移量。

1
2
3
4
5
6
7
8
9
10
11
12
13
14
15
16
17
18
19
20
21
22
23
24
25
26
27
28
29
30
31
32
33
34
35
36
37
38
39
40
41
42
43
44
45
46
47
48
49
50
51
52
53
54
55
56
57
58
59
60
61
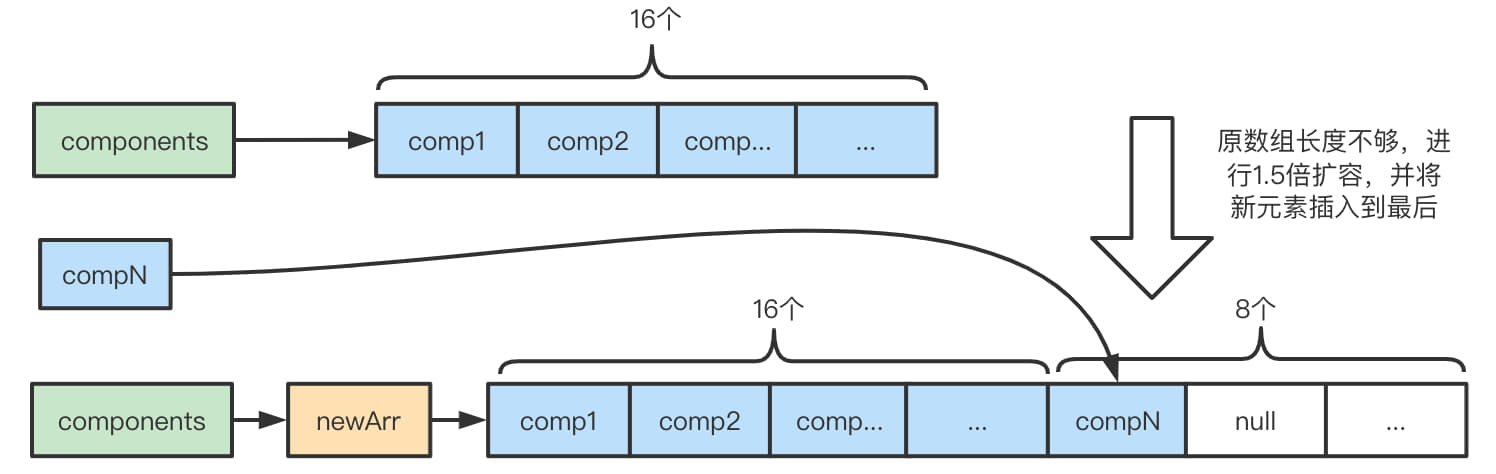
/**
* This should only be called as last operation from a method as this may adjust the underlying
* array of components and so affect the index etc.
*/
//io.netty.buffer.CompositeByteBuf#consolidateIfNeeded
private void consolidateIfNeeded() {
// Consolidate if the number of components will exceed the allowed maximum by the current
// operation.
int size = componentCount;
if (size > maxNumComponents) {
consolidate0(0, size); 从头开始合并成一个
}
}

// 这一段逻辑很简单,申请一个数组中所有bytebuf总和大小的空间,并把每一个byteBuf
// 拷贝里面整合成一个bytebuf.
//io.netty.buffer.CompositeByteBuf#consolidate0
private void consolidate0(int cIndex, int numComponents) {
if (numComponents <= 1) {
return;
}
//计算需要合并的components结束的索引
final int endCIndex = cIndex + numComponents;
//计算需要合并的开始位置的偏移量
final int startOffset = cIndex != 0 ? components[cIndex].offset : 0;
//计算需要合并的components的总容量大小
final int capacity = components[endCIndex - 1].endOffset - startOffset;
// 申请对应容量的ByteBuf
final ByteBuf consolidated = allocBuffer(capacity);

// 循环写入components中的byteBuf到新的空间中。
for (int i = cIndex; i < endCIndex; i ++) {
components[i].transferTo(consolidated);
}
lastAccessed = null;
// 移除components数组中已经合并的component。
removeCompRange(cIndex + 1, endCIndex);
//为合并后的byteBuf创建component并插入到对应的位置上,最后调整bytebuf的偏移量。
components[cIndex] = newComponent(consolidated, 0);
if (cIndex != 0 || numComponents != componentCount) {
updateComponentOffsets(cIndex);
}
}

//移除的逻辑也很简单,将范围后的元素拷贝到移除范围区间内,并将后面的无效元素设置为null即可。
//io.netty.buffer.CompositeByteBuf#removeCompRange
private void removeCompRange(int from, int to) {
if (from >= to) {
return;
}
final int size = componentCount;
assert from >= 0 && to <= size;
if (to < size) {
System.arraycopy(components, to, components, from, size - to);
}
int newSize = size - to + from;
for (int i = newSize; i < size; i++) {
components[i] = null;
}
componentCount = newSize;
}

removeComponent() 剖析解读

上面我们分析了将component加入数组的逻辑addComponent()的逻辑,当然有add操作就会有remove操作,而移除操作相较于add,removeComponent()操作则简单不少,其实前面的合并操作也设计了一些移除操作。在移除过程中我们不必考虑数组的扩容问题,只需要删除需要移除的元素,并整理数组更新索引即可。以下是移除操作代码剖析。

1
2
3
4
5
6
7
8
9
10
11
12
13
14
15
16
17
18
19
20
21
22
23
24
25
26
27
28
29
30
31
32
33
//io.netty.buffer.CompositeByteBuf#removeComponents
public CompositeByteBuf removeComponents(int cIndex, int numComponents) {
// 校验要移除位置的索引
checkComponentIndex(cIndex, numComponents);

if (numComponents == 0) {
return this;
}
//计算移除的范围索引
int endIndex = cIndex + numComponents;
boolean needsUpdate = false;
for (int i = cIndex; i < endIndex; ++i) {
// 循环遍历要移除的component进行释放。
// 如果遍历的component的长度大0,则表明要需要更新数组偏移量。
Component c = components[i];
if (c.length() > 0) {
needsUpdate = true;
}
if (lastAccessed == c) {
lastAccessed = null;
}
c.free();
}
// 在数组上移除范围内的component
removeCompRange(cIndex, endIndex);

if (needsUpdate) {
// Only need to call updateComponentOffsets if the length was > 0
// 更新数组中component的offset。
updateComponentOffsets(cIndex);
}
return this;
}

discardReadComponents() 源码剖析

compositeByteBuf的最后还有一个重要的方法discardReadComponents(),即移除已读字节,其方法解读如下:

1
2
3
4
5
6
7
8
9
10
11
12
13
14
15
16
17
18
19
20
21
22
23
24
25
26
27
28
29
30
31
32
33
34
35
36
37
38
39
40
41
42
43
44
45
46
47
48
49
50
51
52
53
54
55
56
//io.netty.buffer.CompositeByteBuf#discardReadComponents
public CompositeByteBuf discardReadComponents() {
ensureAccessible();
final int readerIndex = readerIndex();
if (readerIndex == 0) {
return this;
}

// Discard everything if (readerIndex = writerIndex = capacity).
int writerIndex = writerIndex();
// 如果当前读索引等于当前写索引并且写索引等于当前容量,这说明当前容量已经用完。
// 全部释放即可
if (readerIndex == writerIndex && writerIndex == capacity()) {
for (int i = 0, size = componentCount; i < size; i++) {
components[i].free();
}
lastAccessed = null;
clearComps();
setIndex(0, 0);
adjustMarkers(readerIndex);
return this;
}

// Remove read components.
int firstComponentId = 0;
Component c = null;
// 从数组第一个元素开始遍历。
for (int size = componentCount; firstComponentId < size; firstComponentId++) {
c = components[firstComponentId];
// 如果endOffset > readIndex, 则说明当前ByteBuf中还有数据没未读完,
// 直接跳过,否则直接进行释放。
if (c.endOffset > readerIndex) {
break;
}
c.free();
}
//一个都没有释放。
if (firstComponentId == 0) {
return this; // Nothing to discard
}
// 如果最后一个读取的buffer不为空并且已经全部完成读取直接置空la
Component la = lastAccessed;
if (la != null && la.endOffset <= readerIndex) {
lastAccessed = null;
}
// 从数组中移除已释放的元素
removeCompRange(0, firstComponentId);
// Update indexes and markers.
int offset = c.offset;
// 在移除元素后需要重新整理数组中的offset
updateComponentOffsets(0);
setIndex(readerIndex - offset, writerIndex - offset);
//更新标记索引
adjustMarkers(offset);
return this;
}

PooledByteBuf 源码剖析

PooledByteBuf是ByteBuf非常重要的抽象类,这个类继承于AbstractReferenceCountedByteBuf,其对象主要由内存分配器PoolByteBufAllocator创建。比较常见的实现类有两种:一种是基于对外直接内存池构建的PoolDirectByteBuf,是Netty在进行IO读写的时的内存分配的默认方式,堆外直接内存可以减少内存数据拷贝次数;另一种是基于堆内内存池构建的PoolHeapByteBuf。这里我们简单分析PooledByteBuf,池化的ByteBuf涉及到一些Netty的内存的分配管理策略这个我们会在后面的小节中详细分析。

基础结构与属性

创建PooledByteBuf对象的开销非常大,而且在高并发的情况下,当网络IO进行读写时会创建大量的实例。因此,为了降低系统的开销,Netty对Buffer对象进行了池化,缓存了Buffer对象,使对此类型的Buffer可进行重复利用,PooledByteBuf是从内存池中分配出来的Buffer,因此他需要包含内存池的相关信息,如内存块Chunk、PooledByteBuf在内存块中的位置及本身所占空间的大小等。下图描述了PooledByteBuf的核心功能和属性。

如果对于这块的内存池的部分感到陌生不知所措,不必感到沮丧。后面我们会对Netty的池化内存管理进行分析,完成那部分的梳理,对于这里的各个属性字段也就熟悉了。

初始化与从Channel中读写数据

以下是PooledByteBuf的初始化方法解读,这个初始化的过程很简单,前面我们也提到了PooledByteBuf是从内存池中分配出来的Buffer。因此需要记录当前ByteBuf是属于那块chunk,哪部分缓存空间。因此这下面会带有chunkmemoryhandler等属性。

1
2
3
4
5
6
7
8
9
10
11
12
13
14
15
16
17
18
19
20
21
22
23
24
//io.netty.buffer.PooledByteBuf#init0
private void init0(PoolChunk<T> chunk, ByteBuffer nioBuffer,
long handle, int offset, int length, int maxLength, PoolThreadCache cache) {
assert handle >= 0;
assert chunk != null;
// 大块内存默认为16MB,被分配给多个PooledByteBuf
this.chunk = chunk;
// chunk中具体的缓存空间
memory = chunk.memory;
// 将PooledByteBuf 转换成 ByteBuffer
tmpNioBuf = nioBuffer;
// 内存分配器:PooledByteBuf 是由Arena 的分配器构建的。
allocator = chunk.arena.parent;
// 线程缓存:优先从线程缓存中获取
this.cache = cache;
// 通过这个指针可以得到 PooledByteBuffer在 chunk 这颗二叉树中的具体位置
this.handle = handle;
// 偏移量
this.offset = offset;
// 实际具体长度
this.length = length;
// 写指针不能超过PooledByteBuf的最大可用长度
this.maxLength = maxLength;
}

从Channel中写数据的解读剖析如下:

1
2
3
4
5
6
7
8
9
10
11
12
13
14
15
16
17
18
19
20
21
22
23
24
25
26
27
28
29
30
31
32
33
34
35
36
37
38
39
40
41
42
43
44
45
/**
* channel从PooledByteBuf中获取数据,及将数据写入到channel中
* PooledByteBuf的读索引的变化
* 由父类 AbstractByteBuf的readBytes()方法维护
*/
//io.netty.buffer.PooledByteBuf#getBytes(int, java.nio.channels.GatheringByteChannel, int)
@Override
public final int getBytes(int index, GatheringByteChannel out, int length) throws IOException {
return out.write(duplicateInternalNioBuffer(index, length));
}

/**
* 从memory中创建一份缓存 ByteBuffer
* 与memory共享底层数据,但读写索引独立维护
*/
//io.netty.buffer.PooledByteBuf#duplicateInternalNioBuffer
ByteBuffer duplicateInternalNioBuffer(int index, int length) {
// 校验检查
checkIndex(index, length);
//这里传入的是true,就是要构建memory的bytebuf
return _internalNioBuffer(index, length, true);
}

//io.netty.buffer.PooledByteBuf#_internalNioBuffer
final ByteBuffer _internalNioBuffer(int index, int length, boolean duplicate) {
// 获取索引
index = idx(index);
// 当duplicate为true时,在memory中创建共享此缓冲区内从的新的字节缓冲区
// 当duplicate为false时,先从tmpNioBuf中获取,当tmpNioBuf为空时
// 再次newInternalNioBuffer,此处与memory的类型有关,因此具体实现由子类完成。
ByteBuffer buffer = duplicate ? newInternalNioBuffer(memory) : internalNioBuffer();
buffer.limit(index + length).position(index);
return buffer;
}

//io.netty.buffer.PooledByteBuf#internalNioBuffer()
protected final ByteBuffer internalNioBuffer() {
ByteBuffer tmpNioBuf = this.tmpNioBuf;
if (tmpNioBuf == null) {
this.tmpNioBuf = tmpNioBuf = newInternalNioBuffer(memory);
} else {
tmpNioBuf.clear();
}
return tmpNioBuf;
}

往Channel中读入数据的解读如下:

1
2
3
4
5
6
7
8
9
10
11
12
13
14
15
16
17
18
//io.netty.buffer.PooledByteBuf#setBytes(int, java.nio.channels.ScatteringByteChannel, int)
@Override
public final int setBytes(int index, ScatteringByteChannel in, int length) throws IOException {
try {
构建空的缓冲区,将数据读入
return in.read(internalNioBuffer(index, length));
} catch (ClosedChannelException ignored) {
return -1;
}
}

//io.netty.buffer.PooledByteBuf#duplicateInternalNioBuffer
@Override
public final ByteBuffer internalNioBuffer(int index, int length) {
checkIndex(index, length);
// 这里传入的false,即当tmpNioBuf为空的时候构建新的buffer
return _internalNioBuffer(index, length, false);
}

自动扩容与代码对象回收

有容量上线就会涉及到有容量就会有扩容操作。

1
2
3
4
5
6
7
8
9
10
11
12
13
14
15
16
17
18
19
20
21
22
23
24
25
26
27
28
29
30
31
32
33
34
35
36
37
38
39
40
41
42
43
44
/**
* 自动扩容
*/
//io.netty.buffer.PooledByteBuf#capacity(int)
@Override
public final ByteBuf capacity(int newCapacity) {
// 若新的容量值与长度相等,则无需扩容,直接返回即可。
if (newCapacity == length) {
ensureAccessible();
return this;
}
// 检查新的容量值是否大于最大允许容量。
checkNewCapacity(newCapacity);
/**
* 非内存池,在新容量值小于最大长度值的情况下,无需重新分配
* 只需修改索引和数据长度即可
*/
if (!chunk.unpooled) {
// If the request capacity does not require reallocation, just update the length of the memory.
/**
* 新的容量值大于长度值
* 在没有超过 Buffer 的最大长度值时,只需把长度设为新的容量值即可
* 若超过了最大可用长度值,则可能重新分配
*/
if (newCapacity > length) {
if (newCapacity <= maxLength) {
length = newCapacity;
return this;
}
} else if (newCapacity > maxLength >>> 1 &&
(maxLength > 512 || newCapacity > maxLength - 16)) {
//当新容量值小于大于最大可用长度值时,其读/写索引不能超过新容量值。
// here newCapacity < length
length = newCapacity;
trimIndicesToCapacity(newCapacity);
return this;
}
}

// Reallocation required.
// 由Arena重新分配内存分配并释放旧的内存
chunk.arena.reallocate(this, newCapacity, true);
return this;
}

PooledByteBuf 对象回收代码解读如下:

1
2
3
4
5
6
7
8
9
10
11
12
13
14
15
16
17
18
19
20
21
22
/**
* 对象回收,把对象属性清空
*/
//io.netty.buffer.PooledByteBuf#deallocate
@Override
protected final void deallocate() {
if (handle >= 0) {
final long handle = this.handle;
this.handle = -1;
memory = null;
// 释放内存
chunk.arena.free(chunk, tmpNioBuf, handle, maxLength, cache);
tmpNioBuf = null;
chunk = null;
recycle();
}
}
// 把PooledByteBuf 放回对象池Stack中,以便下次使用
//io.netty.buffer.PooledByteBuf#recycle
private void recycle() {
recyclerHandle.recycle(this);
}

总结

这一小节我们梳理了ByteBuf,开篇我们快速回顾了ByteBuffer,介绍了了ByteBuf的实例方法和一些常用方法。随后我们梳理了Netty中ByteBuf的子类,我们介绍了AbstractByteBufAbstractReferenceCountedByteBufReferenceCountUpdater基于引用计数的ByteBuf的实现,通过引用计数来管理,ByteBuf的申请与释放。随后我们介绍了PooledByteBuf。它继承于AbstractReferenceCountedByteBuf,基于引用计数,对内存资源进行池化管理,避免重复的申请和释放带来的资源消耗。中间我们还用了比较大的篇幅去介绍了CompositeByteBuf,它通过把多个ByteBuf组合起来,然后通过把ByteBuf封装成一个个component组成的components数组来管理操作多个ByteBuf。随后我们梳理剖析了它的 add、remove和discard等方法。下一小节开始我们结合这一小节和前面几个小结梳理的Netty核心组件,来看看Netty的读写流程是怎么样。

学习资料