publicstaticvoidmain(String[] args)throws Exception { // Configure SSL. final SslContext sslCtx; if (SSL) { SelfSignedCertificate ssc = new SelfSignedCertificate(); sslCtx = SslContextBuilder.forServer(ssc.certificate(), ssc.privateKey()).build(); } else { sslCtx = null; }
// 核心配置代码从这里开始 // Configure the server. EventLoopGroup bossGroup = new NioEventLoopGroup(1); EventLoopGroup workerGroup = new NioEventLoopGroup();
final EchoServerHandler serverHandler = new EchoServerHandler(); try { ServerBootstrap b = new ServerBootstrap(); b.group(bossGroup, workerGroup) .channel(NioServerSocketChannel.class) .option(ChannelOption.SO_BACKLOG, 100) .handler(new LoggingHandler(LogLevel.INFO)) .childHandler(new ChannelInitializer<SocketChannel>() { @Override publicvoidinitChannel(SocketChannel ch)throws Exception { ChannelPipeline p = ch.pipeline(); if (sslCtx != null) { p.addLast(sslCtx.newHandler(ch.alloc())); } //p.addLast(new LoggingHandler(LogLevel.INFO)); p.addLast(serverHandler); } });
// Start the server. ChannelFuture f = b.bind(PORT).sync();
// Wait until the server socket is closed. f.channel().closeFuture().sync(); } finally { // Shut down all event loops to terminate all threads. bossGroup.shutdownGracefully(); workerGroup.shutdownGracefully(); } } }
// Task which is scheduled to re-enable auto-read. // It's important to create this Runnable before we try to submit it as otherwise the URLClassLoader may // not be able to load the class because of the file limit it already reached. // // See https://github.com/netty/netty/issues/1328 enableAutoReadTask = new Runnable() { @Override publicvoidrun(){ channel.config().setAutoRead(true); } }; }
privatestaticvoidforceClose(Channel child, Throwable t){ child.unsafe().closeForcibly(); logger.warn("Failed to register an accepted channel: {}", child, t); }
@Override publicvoidexceptionCaught(ChannelHandlerContext ctx, Throwable cause)throws Exception { final ChannelConfig config = ctx.channel().config(); if (config.isAutoRead()) { // stop accept new connections for 1 second to allow the channel to recover // See https://github.com/netty/netty/issues/1328 config.setAutoRead(false); ctx.channel().eventLoop().schedule(enableAutoReadTask, 1, TimeUnit.SECONDS); } // still let the exceptionCaught event flow through the pipeline to give the user // a chance to do something with it ctx.fireExceptionCaught(cause); } }
//io.netty.bootstrap.AbstractBootstrap#bind(int) public ChannelFuture bind(int inetPort){ return bind(new InetSocketAddress(inetPort)); }
//io.netty.bootstrap.AbstractBootstrap#bind(java.net.SocketAddress) public ChannelFuture bind(SocketAddress localAddress){ validate(); return doBind(ObjectUtil.checkNotNull(localAddress, "localAddress")); }
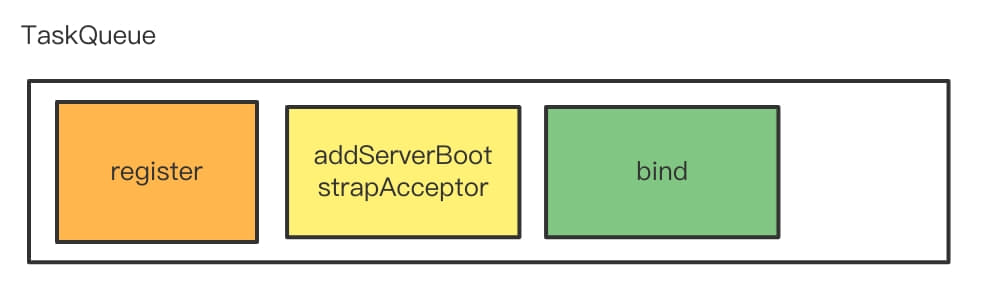
// 以上都是两个bind重载方法,以下进行到真正的bind方法。 //io.netty.bootstrap.AbstractBootstrap#doBind private ChannelFuture doBind(final SocketAddress localAddress){ //前面提到的initAndRegister方法,初始化channel并完成handle的注册操作 // 返回一个包着channel的future对象。 final ChannelFuture regFuture = initAndRegister(); final Channel channel = regFuture.channel(); if (regFuture.cause() != null) { return regFuture; }
// 如果主线执行到这里异步执行的initAndRegister已经执行完成了,直接调用doBind0()方法, // 否则使用channelFuture添加监听器,在完成之后执行doBind0()方法。 if (regFuture.isDone()) { // At this point we know that the registration was complete and successful. ChannelPromise promise = channel.newPromise(); doBind0(regFuture, channel, localAddress, promise); return promise; } else { // Registration future is almost always fulfilled already, but just in case it's not. final PendingRegistrationPromise promise = new PendingRegistrationPromise(channel); regFuture.addListener(new ChannelFutureListener() { @Override publicvoidoperationComplete(ChannelFuture future)throws Exception { Throwable cause = future.cause(); if (cause != null) { // Registration on the EventLoop failed so fail the ChannelPromise directly to not cause an // IllegalStateException once we try to access the EventLoop of the Channel. promise.setFailure(cause); } else { // Registration was successful, so set the correct executor to use. // See https://github.com/netty/netty/issues/2586 promise.registered();
// 初始化channel,这个初始化上面我们分析过,这里就不深入了。 // 里面的大致逻辑是,将ServerBootstrap的handler传入的handler对象加入到channel的pipleline, // 并创建一个eventloop的任务将 ServerBootstrapAcceptor 加入到pipleline最后。 init(channel); } catch (Throwable t) { // 异常处理 if (channel != null) { // channel can be null if newChannel crashed (eg SocketException("too many open files")) channel.unsafe().closeForcibly(); // as the Channel is not registered yet we need to force the usage of the GlobalEventExecutor returnnew DefaultChannelPromise(channel, GlobalEventExecutor.INSTANCE).setFailure(t); } // as the Channel is not registered yet we need to force the usage of the GlobalEventExecutor returnnew DefaultChannelPromise(new FailedChannel(), GlobalEventExecutor.INSTANCE).setFailure(t); }
// If we are here and the promise is not failed, it's one of the following cases: // 1) If we attempted registration from the event loop, the registration has been completed at this point. // i.e. It's safe to attempt bind() or connect() now because the channel has been registered. // 2) If we attempted registration from the other thread, the registration request has been successfully // added to the event loop's task queue for later execution. // i.e. It's safe to attempt bind() or connect() now: // because bind() or connect() will be executed *after* the scheduled registration task is executed // because register(), bind(), and connect() are all bound to the same thread.
//io.netty.channel.AbstractChannel.AbstractUnsafe#register @Override publicfinalvoidregister(EventLoop eventLoop, final ChannelPromise promise){ ObjectUtil.checkNotNull(eventLoop, "eventLoop"); if (isRegistered()) { // 如果已经注册过了 promise.setFailure(new IllegalStateException("registered to an event loop already")); return; } if (!isCompatible(eventLoop)) { promise.setFailure( new IllegalStateException("incompatible event loop type: " + eventLoop.getClass().getName())); return; }
AbstractChannel.this.eventLoop = eventLoop;
if (eventLoop.inEventLoop()) { // 如果当前线程是EventLoop,直接调用注册方法。 register0(promise); } else { // 将注册动作加入到eventLoop的Task中 try { eventLoop.execute(new Runnable() { @Override publicvoidrun(){ register0(promise); } }); } catch (Throwable t) { logger.warn( "Force-closing a channel whose registration task was not accepted by an event loop: {}", AbstractChannel.this, t); closeForcibly(); closeFuture.setClosed(); safeSetFailure(promise, t); } } }
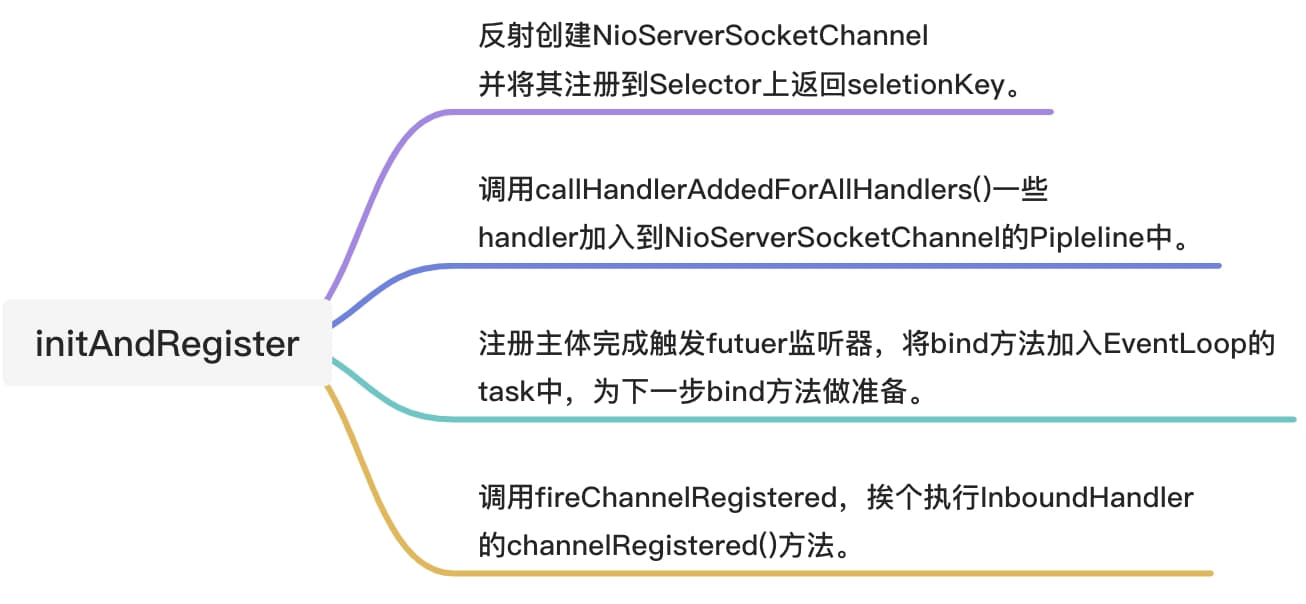
// 注册主方法,这个方法里面完成了注册操作的主要逻辑 //io.netty.channel.AbstractChannel.AbstractUnsafe#register0 privatevoidregister0(ChannelPromise promise){ try { // check if the channel is still open as it could be closed in the mean time when the register // call was outside of the eventLoop if (!promise.setUncancellable() || !ensureOpen(promise)) { return; } boolean firstRegistration = neverRegistered; // 将channel注册到selector上,并设置类局部变量selectionKey doRegister(); neverRegistered = false; registered = true;
// Ensure we call handlerAdded(...) before we actually notify the promise. This is needed as the // user may already fire events through the pipeline in the ChannelFutureListener.
// 下面这个方法将handler加入到pipeline中。这里是NioServerChannel的pipeline pipeline.invokeHandlerAddedIfNeeded(); // 将异步的promise设置成功,并调用promise中添加的Listener监听器。 safeSetSuccess(promise); // 调用依次调用pipleline中inBoundhandler的channelRegistered()方法。 pipeline.fireChannelRegistered(); // Only fire a channelActive if the channel has never been registered. This prevents firing // multiple channel actives if the channel is deregistered and re-registered.
// 如果channel已经被打开,并且已经绑定端口,完成下面的操作,否则方法结束。 // 这个方法在我们后面的源码代码分析中会经常见到。 if (isActive()) { if (firstRegistration) { // 第一次注册要依次调用触发 pipeline.fireChannelActive(); } elseif (config().isAutoRead()) { // 如果开启了自动读,直接开始监听accept事件。 // This channel was registered before and autoRead() is set. This means we need to begin read // again so that we process inbound data. // // See https://github.com/netty/netty/issues/4805 beginRead(); } } } catch (Throwable t) { // Close the channel directly to avoid FD leak. closeForcibly(); closeFuture.setClosed(); safeSetFailure(promise, t); } }
// NioChannel的注册方法,将channel注册到selector上,并返回selectionKey。 //io.netty.channel.nio.AbstractNioChannel#doRegister @Override protectedvoiddoRegister()throws Exception { boolean selected = false; for (;;) { try { selectionKey = javaChannel().register(eventLoop().unwrappedSelector(), 0, this); return; } catch (CancelledKeyException e) { if (!selected) { // Force the Selector to select now as the "canceled" SelectionKey may still be // cached and not removed because no Select.select(..) operation was called yet. eventLoop().selectNow(); selected = true; } else { // We forced a select operation on the selector before but the SelectionKey is still cached // for whatever reason. JDK bug ? throw e; } } } }
//io.netty.channel.DefaultChannelPipeline#invokeHandlerAddedIfNeeded finalvoidinvokeHandlerAddedIfNeeded(){ // 简单的校当前是否是eventloop线程,执行到这,当前一定是eventloop线程。 assert channel.eventLoop().inEventLoop(); // 是否是第一次注册。 if (firstRegistration) { firstRegistration = false; // We are now registered to the EventLoop. It's time to call the callbacks for the ChannelHandlers, // that were added before the registration was done. // 调用真正实现添加handler到pipeline的方法。 callHandlerAddedForAllHandlers(); } }
// This Channel itself was registered. // 将 register 设置为true,这个会影响后面代码的逻辑,在后面的initAndRegister部分会多次出现。 registered = true;
// 将类局部变量赋值给方法变量,方便GC回收。 pendingHandlerCallbackHead = this.pendingHandlerCallbackHead; // Null out so it can be GC'ed. this.pendingHandlerCallbackHead = null; }
// This must happen outside of the synchronized(...) block as otherwise handlerAdded(...) may be called while // holding the lock and so produce a deadlock if handlerAdded(...) will try to add another handler from outside // the EventLoop. PendingHandlerCallback task = pendingHandlerCallbackHead; while (task != null) { // 循环执行依次执行链表中每个callBackTask的execute方法。 task.execute(); task = task.next; } }
//设置异常 if (removed) { fireExceptionCaught(new ChannelPipelineException( ctx.handler().getClass().getName() + ".handlerAdded() has thrown an exception; removed.", t)); } else { fireExceptionCaught(new ChannelPipelineException( ctx.handler().getClass().getName() + ".handlerAdded() has thrown an exception; also failed to remove.", t)); } } }
//io.netty.channel.AbstractChannelHandlerContext#callHandlerAdded finalvoidcallHandlerAdded()throws Exception { // We must call setAddComplete before calling handlerAdded. Otherwise if the handlerAdded method generates // any pipeline events ctx.handler() will miss them because the state will not allow it.
// 调用添加handler方法。 if (setAddComplete()) { handler().handlerAdded(this); } }
// If the registered is false it means that the channel was not registered on an eventLoop yet. // In this case we add the context to the pipeline and add a task that will call // ChannelHandler.handlerAdded(...) once the channel is registered. // 如果当前,还没有注册完成,也就是还没有调用PendingHandlerCallback, // 也就是还没有调用PendingHandlerCallback触发handler的handlerAdd方法。 if (!registered) { newCtx.setAddPending(); callHandlerCallbackLater(newCtx, true); returnthis; }
// io.netty.channel.ChannelInitializer#handlerAdded @Override publicvoidhandlerAdded(ChannelHandlerContext ctx)throws Exception { if (ctx.channel().isRegistered()) { // This should always be true with our current DefaultChannelPipeline implementation. // The good thing about calling initChannel(...) in handlerAdded(...) is that there will be no ordering // surprises if a ChannelInitializer will add another ChannelInitializer. This is as all handlers // will be added in the expected order. // 调用initChannel也就是我们在ServerBootstrap中init构造的内部类的initChannel方法。 if (initChannel(ctx)) {
// We are done with init the Channel, removing the initializer now. removeState(ctx); } } }
//io.netty.channel.ChannelInitializer#initChannel(io.netty.channel.ChannelHandlerContext) @SuppressWarnings("unchecked") privatebooleaninitChannel(ChannelHandlerContext ctx)throws Exception { if (initMap.add(ctx)) { // Guard against re-entrance. try { // 调用执行initChannel 传入channel, 即p.addLast()内部类的initChannel方法。 initChannel((C) ctx.channel()); } catch (Throwable cause) { // Explicitly call exceptionCaught(...) as we removed the handler before calling initChannel(...). // We do so to prevent multiple calls to initChannel(...). exceptionCaught(ctx, cause); } finally { // ChannelInitializer 初始化Handler执行完成之后, // 将当前这个handler从pipeline中移出。 ChannelPipeline pipeline = ctx.pipeline(); if (pipeline.context(this) != null) { pipeline.remove(this); } } returntrue; } returnfalse; }
//io.netty.channel.AbstractChannelHandlerContext#callHandlerAdded finalvoidcallHandlerAdded()throws Exception { // We must call setAddComplete before calling handlerAdded. Otherwise if the handlerAdded method generates // any pipeline events ctx.handler() will miss them because the state will not allow it.
// 调用添加handler方法。 if (setAddComplete()) { handler().handlerAdded(this); } }
//io.netty.channel.AbstractChannel.AbstractUnsafe#register0 privatevoidregister0(ChannelPromise promise){ try { // check if the channel is still open as it could be closed in the mean time when the register // call was outside of the eventLoop if (!promise.setUncancellable() || !ensureOpen(promise)) { return; } boolean firstRegistration = neverRegistered; // 将channel注册到selector上,并设置类局部变量selectionKey doRegister(); neverRegistered = false; registered = true;
// Ensure we call handlerAdded(...) before we actually notify the promise. This is needed as the // user may already fire events through the pipeline in the ChannelFutureListener.
// 下面这个方法将handler加入到pipeline中。这里是NioServerChannel的pipeline pipeline.invokeHandlerAddedIfNeeded(); // 将异步的promise设置成功,并调用promise中添加的Listener监听器。 safeSetSuccess(promise); // 调用依次调用pipleline中inBoundhandler的channelRegistered()方法。 pipeline.fireChannelRegistered(); // Only fire a channelActive if the channel has never been registered. This prevents firing // multiple channel actives if the channel is deregistered and re-registered.
// 如果channel已经被打开,并且已经绑定端口,完成下面的操作,否则方法结束。 // 这个方法在我们后面的源码代码分析中会经常见到。 if (isActive()) { if (firstRegistration) { // 第一次注册要依次调用触发 pipeline.fireChannelActive(); } elseif (config().isAutoRead()) { // 如果开启了自动读,直接开始监听accept事件。 // This channel was registered before and autoRead() is set. This means we need to begin read // again so that we process inbound data. // // See https://github.com/netty/netty/issues/4805 beginRead(); } } } catch (Throwable t) { // Close the channel directly to avoid FD leak. closeForcibly(); closeFuture.setClosed(); safeSetFailure(promise, t); } }
//io.netty.channel.AbstractChannel.AbstractUnsafe#safeSetSuccess protectedfinalvoidsafeSetSuccess(ChannelPromise promise){ // 这里需要重点注意的方法是promise.trySuccess() if (!(promise instanceof VoidChannelPromise) && !promise.trySuccess()) { logger.warn("Failed to mark a promise as success because it is done already: {}", promise); } }
safeExecute(executor, new Runnable() { @Override publicvoidrun(){ notifyListenersNow(); } }); }
//io.netty.util.concurrent.DefaultPromise#notifyListenersNow privatevoidnotifyListenersNow(){ Object listeners; // 加锁将当前需要当前需要notify的监听器取出来,而不是我们一直准备去处理监听器。 // 所以这一段的逻辑就是使用一个方法的局部变量listeners将类局部变量this.listeners // 接出来,并将类的this.listeners设置为null。 synchronized (this) { // Only proceed if there are listeners to notify and we are not already notifying listeners. if (notifyingListeners || this.listeners == null) { return; } notifyingListeners = true; listeners = this.listeners; this.listeners = null; } // 循环listener执行。 for (;;) { if (listeners instanceof DefaultFutureListeners) { notifyListeners0((DefaultFutureListeners) listeners); } else { notifyListener0(this, (GenericFutureListener<?>) listeners); } // 执行完成之后,在将notifyingListeners 加锁并设置为false。 synchronized (this) { if (this.listeners == null) { // Nothing can throw from within this method, so setting notifyingListeners back to false does not // need to be in a finally block. notifyingListeners = false; return; } listeners = this.listeners; this.listeners = null; } } }
// DefaultFutureListeners listener的包装类,里面包了一个listener的list。 //io.netty.util.concurrent.DefaultPromise#notifyListeners0 privatevoidnotifyListeners0(DefaultFutureListeners listeners){ GenericFutureListener<?>[] a = listeners.listeners(); int size = listeners.size(); for (int i = 0; i < size; i ++) { // 循环调用notifyListener0即可。 notifyListener0(this, a[i]); } }
regFuture.addListener(new ChannelFutureListener() { // listener监听器执行逻辑 @Override publicvoidoperationComplete(ChannelFuture future)throws Exception { Throwable cause = future.cause(); if (cause != null) { // Registration on the EventLoop failed so fail the ChannelPromise directly to not cause an // IllegalStateException once we try to access the EventLoop of the Channel. promise.setFailure(cause); } else { // Registration was successful, so set the correct executor to use. // See https://github.com/netty/netty/issues/2586 promise.registered(); // 将bind任务添加到task任务队列中。 doBind0(regFuture, channel, localAddress, promise); } } });
if (isActive()) { if (firstRegistration) { // 第一次注册要依次调用触发 pipeline.fireChannelActive(); } elseif (config().isAutoRead()) { // 如果开启了自动读,直接开始监听accept事件。 // This channel was registered before and autoRead() is set. This means we need to begin read // again so that we process inbound data. // // See https://github.com/netty/netty/issues/4805 beginRead(); } }
//io.netty.util.concurrent.SingleThreadEventExecutor#execute(java.lang.Runnable, boolean) privatevoidexecute(Runnable task, boolean immediate){ boolean inEventLoop = inEventLoop(); // 将任务加入到eventloop的taskQueue中。 addTask(task); // 判断当前是否eventLoop线程,如果不是启动线程 if (!inEventLoop) { startThread(); //是否已经是关闭状态。 if (isShutdown()) { boolean reject = false; try { // 将当前任务从当前队列移除 if (removeTask(task)) { reject = true; } } catch (UnsupportedOperationException e) { // The task queue does not support removal so the best thing we can do is to just move on and // hope we will be able to pick-up the task before its completely terminated. // In worst case we will log on termination. } // 移除成功,抛eventLoop terminate 的异常警告。 if (reject) { reject(); } } }
// Check if confirmShutdown() was called at the end of the loop. if (success && gracefulShutdownStartTime == 0) { if (logger.isErrorEnabled()) { logger.error("Buggy " + EventExecutor.class.getSimpleName() + " implementation; " + SingleThreadEventExecutor.class.getSimpleName() + ".confirmShutdown() must " + "be called before run() implementation terminates."); } }
try { // Run all remaining tasks and shutdown hooks. At this point the event loop // is in ST_SHUTTING_DOWN state still accepting tasks which is needed for // graceful shutdown with quietPeriod. for (;;) { if (confirmShutdown()) { break; } }
// Now we want to make sure no more tasks can be added from this point. This is // achieved by switching the state. Any new tasks beyond this point will be rejected. for (;;) { int oldState = state; if (oldState >= ST_SHUTDOWN || STATE_UPDATER.compareAndSet( SingleThreadEventExecutor.this, oldState, ST_SHUTDOWN)) { break; } }
// We have the final set of tasks in the queue now, no more can be added, run all remaining. // No need to loop here, this is the final pass. confirmShutdown(); } finally { try { cleanup(); } finally { // Lets remove all FastThreadLocals for the Thread as we are about to terminate and notify // the future. The user may block on the future and once it unblocks the JVM may terminate // and start unloading classes. // See https://github.com/netty/netty/issues/6596. FastThreadLocal.removeAll();
//io.netty.channel.nio.NioEventLoop#run @Override protectedvoidrun(){ int selectCnt = 0; for (;;) { try { int strategy; try { strategy = selectStrategy.calculateStrategy(selectNowSupplier, hasTasks()); switch (strategy) { case SelectStrategy.CONTINUE: continue;
case SelectStrategy.BUSY_WAIT: // fall-through to SELECT since the busy-wait is not supported with NIO
case SelectStrategy.SELECT: long curDeadlineNanos = nextScheduledTaskDeadlineNanos(); if (curDeadlineNanos == -1L) { curDeadlineNanos = NONE; // nothing on the calendar } nextWakeupNanos.set(curDeadlineNanos); try { if (!hasTasks()) { strategy = select(curDeadlineNanos); } } finally { // This update is just to help block unnecessary selector wakeups // so use of lazySet is ok (no race condition) nextWakeupNanos.lazySet(AWAKE); } // fall through default: } } catch (IOException e) { // If we receive an IOException here its because the Selector is messed up. Let's rebuild // the selector and retry. https://github.com/netty/netty/issues/8566 rebuildSelector0(); selectCnt = 0; handleLoopException(e); continue; }
selectCnt++; cancelledKeys = 0; needsToSelectAgain = false; finalint ioRatio = this.ioRatio; boolean ranTasks; // 下面这段代码可以看到无论ioRatio的值为多少都会执行runAllTasks();方法 if (ioRatio == 100) { try { if (strategy > 0) { processSelectedKeys(); } } finally { // Ensure we always run tasks. ranTasks = runAllTasks(); } } elseif (strategy > 0) { finallong ioStartTime = System.nanoTime(); try { processSelectedKeys(); } finally { // Ensure we always run tasks. finallong ioTime = System.nanoTime() - ioStartTime; ranTasks = runAllTasks(ioTime * (100 - ioRatio) / ioRatio); } } else { ranTasks = runAllTasks(0); // This will run the minimum number of tasks }
if (ranTasks || strategy > 0) { if (selectCnt > MIN_PREMATURE_SELECTOR_RETURNS && logger.isDebugEnabled()) { logger.debug("Selector.select() returned prematurely {} times in a row for Selector {}.", selectCnt - 1, selector); } selectCnt = 0; } elseif (unexpectedSelectorWakeup(selectCnt)) { // Unexpected wakeup (unusual case) selectCnt = 0; } } catch (CancelledKeyException e) { // Harmless exception - log anyway if (logger.isDebugEnabled()) { logger.debug(CancelledKeyException.class.getSimpleName() + " raised by a Selector {} - JDK bug?", selector, e); } } catch (Error e) { throw e; } catch (Throwable t) { handleLoopException(t); } finally { // Always handle shutdown even if the loop processing threw an exception. try { if (isShuttingDown()) { closeAll(); if (confirmShutdown()) { return; } } } catch (Error e) { throw e; } catch (Throwable t) { handleLoopException(t); } } } }
do { // 从定时任务队列中取出所有满足条件的任务,并将它们加入到taskQueue中。 fetchedAll = fetchFromScheduledTaskQueue(); // 执行所有task队列中的任务 if (runAllTasksFrom(taskQueue)) { ranAtLeastOne = true; } } while (!fetchedAll); // keep on processing until we fetched all scheduled tasks.
// 一个简单的“近实时”的延时队列的实现。 //io.netty.util.concurrent.SingleThreadEventExecutor#fetchFromScheduledTaskQueue privatebooleanfetchFromScheduledTaskQueue(){ if (scheduledTaskQueue == null || scheduledTaskQueue.isEmpty()) { returntrue; } long nanoTime = AbstractScheduledEventExecutor.nanoTime(); for (;;) { // 循环从cheduledTask取出满足条件的task任务。 Runnable scheduledTask = pollScheduledTask(nanoTime); if (scheduledTask == null) { returntrue; } // 将task加入到任务队列taskQueue中。 if (!taskQueue.offer(scheduledTask)) { // No space left in the task queue add it back to the scheduledTaskQueue so we pick it up again. // 如果队列满了加入失败,先将其放回scheduledTaskQueue等task队列消费完成后再次加入 scheduledTaskQueue.add((ScheduledFutureTask<?>) scheduledTask); returnfalse; } } }
// 计算得出这批次执行的deadline finallong deadline = timeoutNanos > 0 ? ScheduledFutureTask.nanoTime() + timeoutNanos : 0; long runTasks = 0; long lastExecutionTime; for (;;) { // 执行runnable任务即执行run方法。 safeExecute(task);
runTasks ++;
// 因为nanoTime()方法是一个开销较大的方法,所以这里满64个任务才校验一次。 // Check timeout every 64 tasks because nanoTime() is relatively expensive. // XXX: Hard-coded value - will make it configurable if it is really a problem. if ((runTasks & 0x3F) == 0) { // 执行满64个校验当前是否超过deadline lastExecutionTime = ScheduledFutureTask.nanoTime(); if (lastExecutionTime >= deadline) { //如果是,退出循环执行后续逻辑。 break; } } // 否则取出下一个任务继续循环执行。 task = pollTask(); if (task == null) { lastExecutionTime = ScheduledFutureTask.nanoTime(); break; } }
//io.netty.bootstrap.AbstractBootstrap#doBind0 privatestaticvoiddoBind0( final ChannelFuture regFuture, final Channel channel, final SocketAddress localAddress, final ChannelPromise promise){
// This method is invoked before channelRegistered() is triggered. Give user handlers a chance to set up // the pipeline in its channelRegistered() implementation. //通过eventLoop的task任务方式异步执行。 channel.eventLoop().execute(new Runnable() { @Override publicvoidrun(){ // 注册成功执行。 if (regFuture.isSuccess()) { channel.bind(localAddress, promise).addListener(ChannelFutureListener.CLOSE_ON_FAILURE); } else { promise.setFailure(regFuture.cause()); } } }); }
//io.netty.channel.AbstractChannel.AbstractUnsafe#bind @Override publicfinalvoidbind(final SocketAddress localAddress, final ChannelPromise promise){ assertEventLoop();
// 确保当前promise不可取消并且当前channel还没有open if (!promise.setUncancellable() || !ensureOpen(promise)) { return; }
// See: https://github.com/netty/netty/issues/576 if (Boolean.TRUE.equals(config().getOption(ChannelOption.SO_BROADCAST)) && localAddress instanceof InetSocketAddress && !((InetSocketAddress) localAddress).getAddress().isAnyLocalAddress() && !PlatformDependent.isWindows() && !PlatformDependent.maybeSuperUser()) { // Warn a user about the fact that a non-root user can't receive a // broadcast packet on *nix if the socket is bound on non-wildcard address. logger.warn( "A non-root user can't receive a broadcast packet if the socket " + "is not bound to a wildcard address; binding to a non-wildcard " + "address (" + localAddress + ") anyway as requested."); }
// io.netty.channel.nio.AbstractNioChannel#doBeginRead @Override protectedvoiddoBeginRead()throws Exception { // Channel.read() or ChannelHandlerContext.read() was called final SelectionKey selectionKey = this.selectionKey; if (!selectionKey.isValid()) { return; }
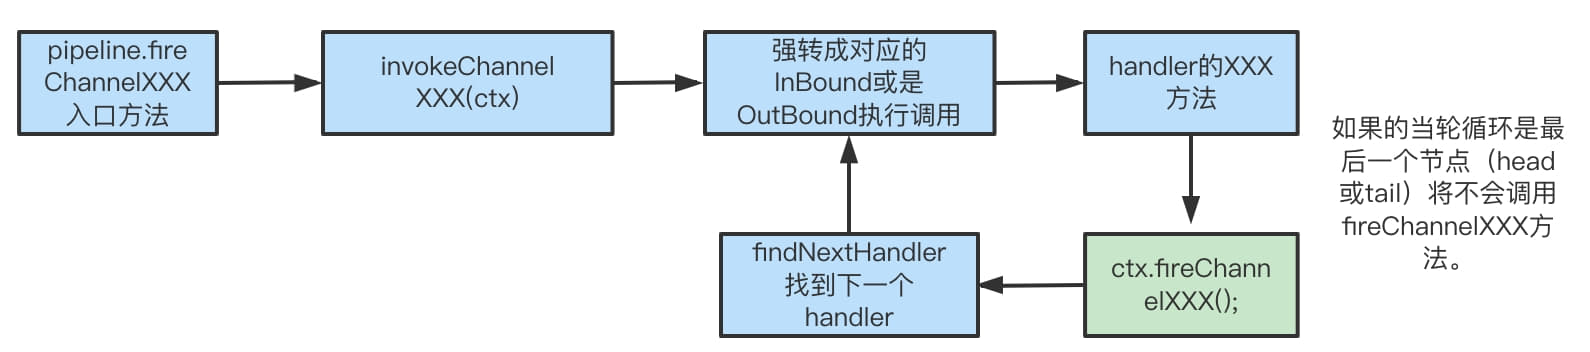
//io.netty.channel.AbstractChannelHandlerContext#skipContext privatestaticbooleanskipContext( AbstractChannelHandlerContext ctx, EventExecutor currentExecutor, int mask, int onlyMask){ // Ensure we correctly handle MASK_EXCEPTION_CAUGHT which is not included in the MASK_EXCEPTION_CAUGHT
// 因为每个executionMask上标识了当前handler可以执行的方法,通过和mask比较的结果 // 即可知道当前handler是否是合适的可以执行的handler return (ctx.executionMask & (onlyMask | mask)) == 0 || // We can only skip if the EventExecutor is the same as otherwise we need to ensure we offload // everything to preserve ordering. // // See https://github.com/netty/netty/issues/10067 (ctx.executor() == currentExecutor && (ctx.executionMask & mask) == 0); }
// io.netty.channel.AbstractChannelHandlerContext#AbstractChannelHandlerContext AbstractChannelHandlerContext(DefaultChannelPipeline pipeline, EventExecutor executor, String name, Class<? extends ChannelHandler> handlerClass) { this.name = ObjectUtil.checkNotNull(name, "name"); this.pipeline = pipeline; this.executor = executor; this.executionMask = mask(handlerClass); // Its ordered if its driven by the EventLoop or the given Executor is an instanceof OrderedEventExecutor. ordered = executor == null || executor instanceof OrderedEventExecutor; }
/** * Return the {@code executionMask}. */ //io.netty.channel.ChannelHandlerMask#mask staticintmask(Class<? extends ChannelHandler> clazz){ // Try to obtain the mask from the cache first. If this fails calculate it and put it in the cache for fast // lookup in the future. // 加一层缓存和生成executeMask的逻辑 Map<Class<? extends ChannelHandler>, Integer> cache = MASKS.get(); Integer mask = cache.get(clazz); if (mask == null) { mask = mask0(clazz); cache.put(clazz, mask); } return mask; }
//io.netty.channel.ChannelHandlerMask#mask0 privatestaticintmask0(Class<? extends ChannelHandler> handlerType){ int mask = MASK_EXCEPTION_CAUGHT; try { // 使用反射来判断当前类中是否包含某个方法,如果包含则标识对应的标识位。 if (ChannelInboundHandler.class.isAssignableFrom(handlerType)) { mask |= MASK_ALL_INBOUND;
if (isSkippable(handlerType, "channelRegistered", ChannelHandlerContext.class)) { mask &= ~MASK_CHANNEL_REGISTERED; } if (isSkippable(handlerType, "channelUnregistered", ChannelHandlerContext.class)) { mask &= ~MASK_CHANNEL_UNREGISTERED; } if (isSkippable(handlerType, "channelActive", ChannelHandlerContext.class)) { mask &= ~MASK_CHANNEL_ACTIVE; } if (isSkippable(handlerType, "channelInactive", ChannelHandlerContext.class)) { mask &= ~MASK_CHANNEL_INACTIVE; } if (isSkippable(handlerType, "channelRead", ChannelHandlerContext.class, Object.class)) { mask &= ~MASK_CHANNEL_READ; } if (isSkippable(handlerType, "channelReadComplete", ChannelHandlerContext.class)) { mask &= ~MASK_CHANNEL_READ_COMPLETE; } if (isSkippable(handlerType, "channelWritabilityChanged", ChannelHandlerContext.class)) { mask &= ~MASK_CHANNEL_WRITABILITY_CHANGED; } if (isSkippable(handlerType, "userEventTriggered", ChannelHandlerContext.class, Object.class)) { mask &= ~MASK_USER_EVENT_TRIGGERED; } }
if (ChannelOutboundHandler.class.isAssignableFrom(handlerType)) { mask |= MASK_ALL_OUTBOUND;