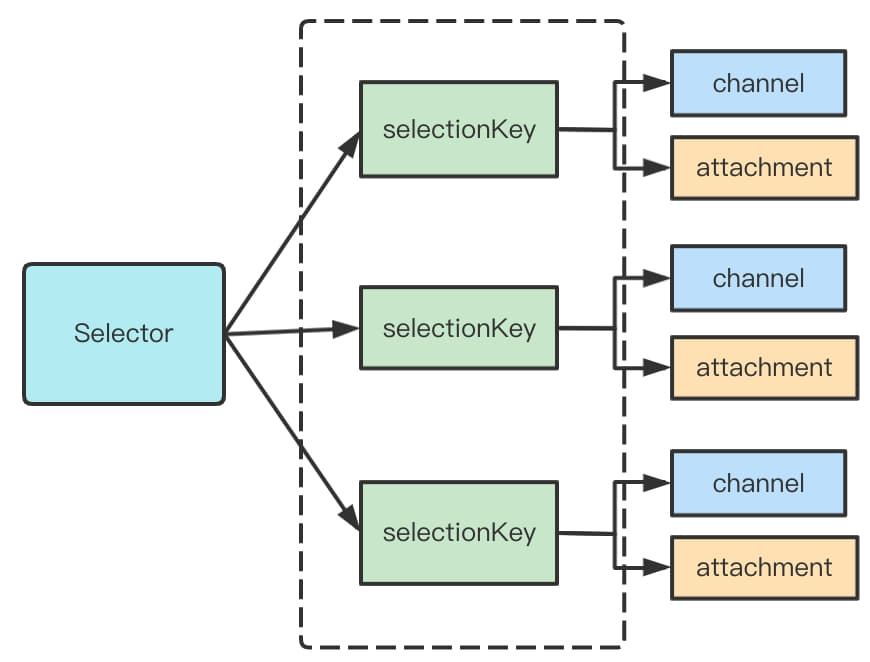
//io.netty.channel.nio.NioEventLoop#processSelectedKeysOptimized privatevoidprocessSelectedKeysOptimized(){ for (int i = 0; i < selectedKeys.size; ++i) { final SelectionKey k = selectedKeys.keys[i]; // null out entry in the array to allow to have it GC'ed once the Channel close // See https://github.com/netty/netty/issues/2363 // 将selectedKeys.keys[i]设置为null,并被JVM快速回收。 selectedKeys.keys[i] = null;
if (needsToSelectAgain) { // null out entries in the array to allow to have it GC'ed once the Channel close // See https://github.com/netty/netty/issues/2363 selectedKeys.reset(i + 1);
selectAgain(); i = -1; } } }
//io.netty.channel.nio.NioEventLoop#processSelectedKey(java.nio.channels.SelectionKey, io.netty.channel.nio.AbstractNioChannel) privatevoidprocessSelectedKey(SelectionKey k, AbstractNioChannel ch){ final AbstractNioChannel.NioUnsafe unsafe = ch.unsafe(); //如果当前selectionKey无效,直接关闭unsafe。 if (!k.isValid()) { final EventLoop eventLoop; try { eventLoop = ch.eventLoop(); } catch (Throwable ignored) { // If the channel implementation throws an exception because there is no event loop, we ignore this // because we are only trying to determine if ch is registered to this event loop and thus has authority // to close ch. return; } // Only close ch if ch is still registered to this EventLoop. ch could have deregistered from the event loop // and thus the SelectionKey could be cancelled as part of the deregistration process, but the channel is // still healthy and should not be closed. // See https://github.com/netty/netty/issues/5125 if (eventLoop == this) { // close the channel if the key is not valid anymore unsafe.close(unsafe.voidPromise()); } return; }
try { int readyOps = k.readyOps(); // We first need to call finishConnect() before try to trigger a read(...) or write(...) as otherwise // the NIO JDK channel implementation may throw a NotYetConnectedException. // 处理连接事件 if ((readyOps & SelectionKey.OP_CONNECT) != 0) { // remove OP_CONNECT as otherwise Selector.select(..) will always return without blocking // See https://github.com/netty/netty/issues/924 int ops = k.interestOps(); ops &= ~SelectionKey.OP_CONNECT; k.interestOps(ops);
unsafe.finishConnect(); }
// 处理写事件 // Process OP_WRITE first as we may be able to write some queued buffers and so free memory. if ((readyOps & SelectionKey.OP_WRITE) != 0) { // Call forceFlush which will also take care of clear the OP_WRITE once there is nothing left to write ch.unsafe().forceFlush(); }
// 处理读事件和ACCEPT事件 // Also check for readOps of 0 to workaround possible JDK bug which may otherwise lead // to a spin loop if ((readyOps & (SelectionKey.OP_READ | SelectionKey.OP_ACCEPT)) != 0 || readyOps == 0) { unsafe.read(); } } catch (CancelledKeyException ignored) { unsafe.close(unsafe.voidPromise()); } }
if (closed) { // 正常关闭。 inputShutdown = true; if (isOpen()) { close(voidPromise()); } } } finally { // Check if there is a readPending which was not processed yet. // This could be for two reasons: // * The user called Channel.read() or ChannelHandlerContext.read() in channelRead(...) method // * The user called Channel.read() or ChannelHandlerContext.read() in channelReadComplete(...) method // // See https://github.com/netty/netty/issues/2254 if (!readPending && !config.isAutoRead()) { removeReadOp(); } } }
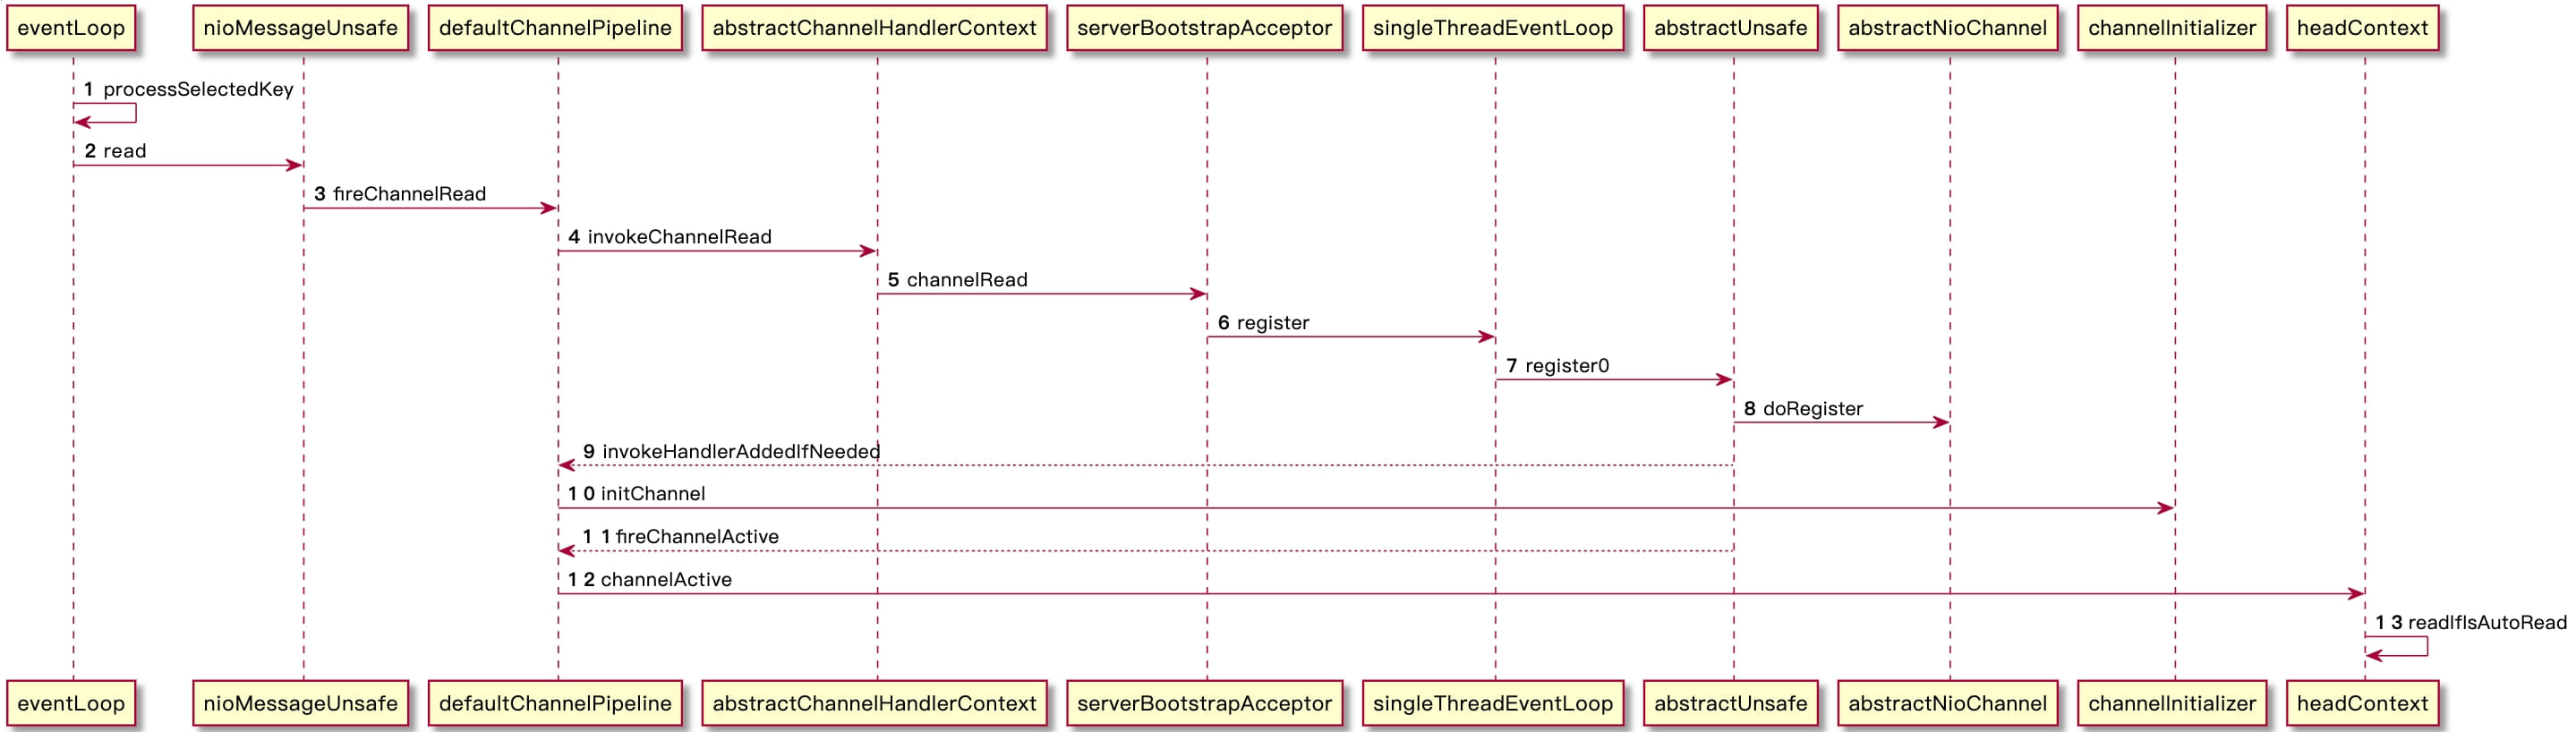
try { if (ch != null) { // 将socketChannel包装成NioSocketChannel并放入到buf中 buf.add(new NioSocketChannel(this, ch)); return1; } } catch (Throwable t) { logger.warn("Failed to create a new channel from an accepted socket.", t);
try { ch.close(); } catch (Throwable t2) { logger.warn("Failed to close a socket.", t2); } }
// 当前调用的线程是bossGroup的线程,因此这里走false分支 if (eventLoop.inEventLoop()) { register0(promise); } else { try { // 启动workerGroup线程继续完车register0的逻辑 eventLoop.execute(new Runnable() { @Override publicvoidrun(){ register0(promise); } }); } catch (Throwable t) { logger.warn( "Force-closing a channel whose registration task was not accepted by an event loop: {}", AbstractChannel.this, t); closeForcibly(); closeFuture.setClosed(); safeSetFailure(promise, t); } } }
//io.netty.channel.AbstractChannel.AbstractUnsafe#register0 privatevoidregister0(ChannelPromise promise){ try { // check if the channel is still open as it could be closed in the mean time when the register // call was outside of the eventLoop if (!promise.setUncancellable() || !ensureOpen(promise)) { return; } boolean firstRegistration = neverRegistered; // 将channel注册到eventLoop的selector上设置selectionKey doRegister(); neverRegistered = false; registered = true;
// Ensure we call handlerAdded(...) before we actually notify the promise. This is needed as the // user may already fire events through the pipeline in the ChannelFutureListener. // 将childHandler加入到nioSocketChannel中 pipeline.invokeHandlerAddedIfNeeded();
// promise设置成功 safeSetSuccess(promise); // 调用pipelineChannelHandler的channelRegister方法。 pipeline.fireChannelRegistered(); // Only fire a channelActive if the channel has never been registered. This prevents firing // multiple channel actives if the channel is deregistered and re-registered. // 当前chennal已经被激活 if (isActive()) { if (firstRegistration) { 调用pipelineChannelHandler的channelActive方法 pipeline.fireChannelActive(); } elseif (config().isAutoRead()) { // This channel was registered before and autoRead() is set. This means we need to begin read // again so that we process inbound data. // // See https://github.com/netty/netty/issues/4805 beginRead(); } } } catch (Throwable t) { // Close the channel directly to avoid FD leak. closeForcibly(); closeFuture.setClosed(); safeSetFailure(promise, t); } }
// io.netty.channel.nio.AbstractNioChannel#doRegister @Override protectedvoiddoRegister()throws Exception { boolean selected = false; for (;;) { try { selectionKey = javaChannel().register(eventLoop().unwrappedSelector(), 0, this); return; } catch (CancelledKeyException e) { if (!selected) { // Force the Selector to select now as the "canceled" SelectionKey may still be // cached and not removed because no Select.select(..) operation was called yet. eventLoop().selectNow(); selected = true; } else { // We forced a select operation on the selector before but the SelectionKey is still cached // for whatever reason. JDK bug ? throw e; } } } }
//io.netty.channel.nio.AbstractNioChannel#doBeginRead @Override protectedvoiddoBeginRead()throws Exception { // Channel.read() or ChannelHandlerContext.read() was called final SelectionKey selectionKey = this.selectionKey; if (!selectionKey.isValid()) { return; }
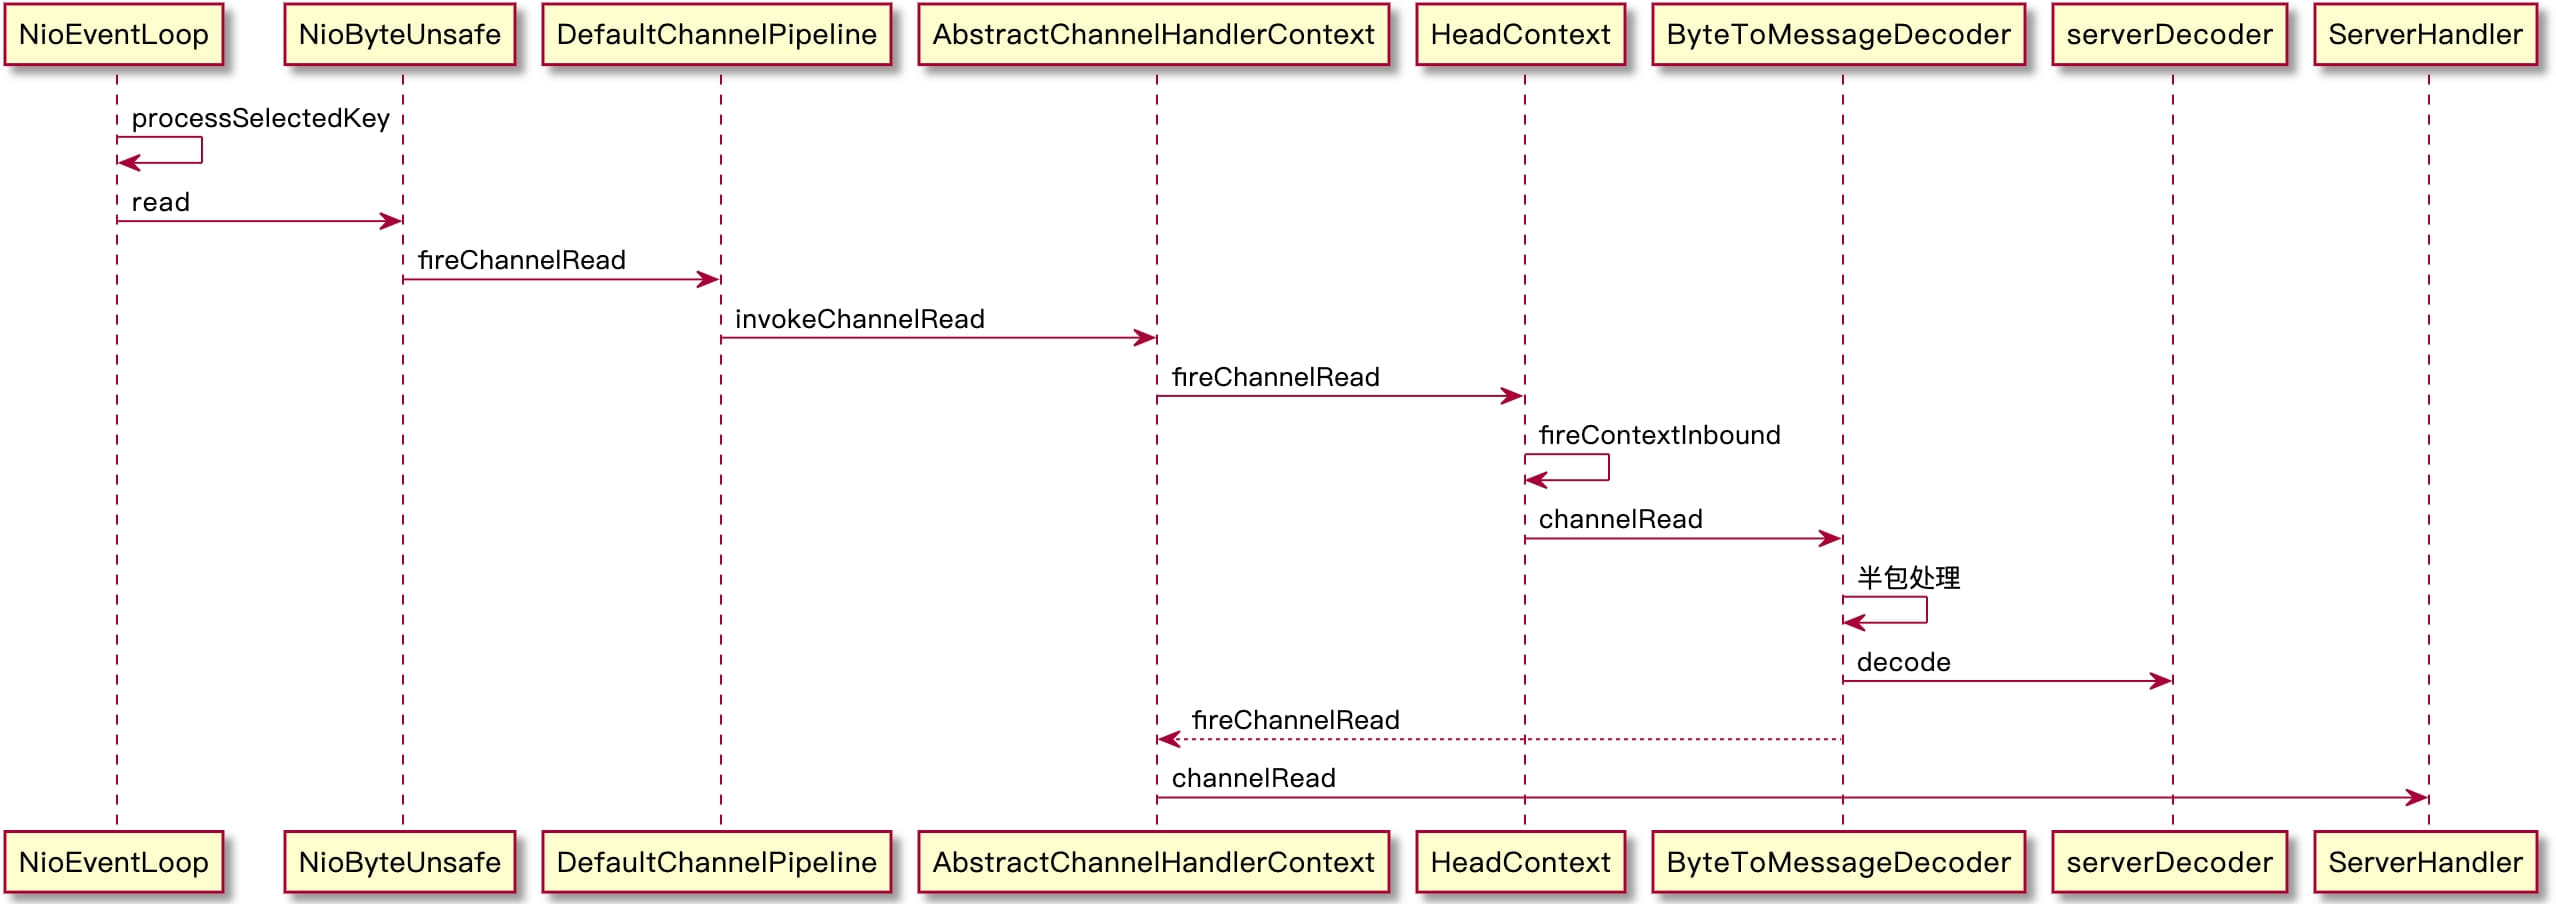
//io.netty.channel.nio.AbstractNioByteChannel.NioByteUnsafe#read @Override publicfinalvoidread(){ //获取pipeline通道配置、channel管道 final ChannelConfig config = config(); //socketChannel已经关闭 if (shouldBreakReadReady(config)) { clearReadPending(); return; } final ChannelPipeline pipeline = pipeline(); // 获取内容分配器,默认为PooledByteBufAllocator final ByteBufAllocator allocator = config.getAllocator(); final RecvByteBufAllocator.Handle allocHandle = recvBufAllocHandle(); //清空上一次读取的字节数,每次读取时均重新计算 //字节Buf分配器,并计算字节buf分配器 Handler allocHandle.reset(config);
ByteBuf byteBuf = null; boolean close = false; try { do { // 分配内存 byteBuf = allocHandle.allocate(allocator); // 读取通道接收缓冲区的数据 allocHandle.lastBytesRead(doReadBytes(byteBuf)); if (allocHandle.lastBytesRead() <= 0) { // nothing was read. release the buffer. // 若没有数据可以读,则释放内存 byteBuf.release(); byteBuf = null; close = allocHandle.lastBytesRead() < 0; if (close) { //当读到-1时,表示Channel通道已经关闭,没有必要再继续读。 // There is nothing left to read as we received an EOF. readPending = false; } break; } // 更新读取消息计数器 allocHandle.incMessagesRead(1); readPending = false; //通知通道处理器处理数据,触发Channel通道的fireChannelRead事件 pipeline.fireChannelRead(byteBuf); byteBuf = null; } while (allocHandle.continueReading()); // 读取操作完毕 allocHandle.readComplete(); pipeline.fireChannelReadComplete();
if (close) { // 如果Socket通道关闭,则关闭读操作 closeOnRead(pipeline); } } catch (Throwable t) { // 处理读异常 handleReadException(pipeline, byteBuf, t, close, allocHandle); } finally { // Check if there is a readPending which was not processed yet. // This could be for two reasons: // * The user called Channel.read() or ChannelHandlerContext.read() in channelRead(...) method // * The user called Channel.read() or ChannelHandlerContext.read() in channelReadComplete(...) method // // See https://github.com/netty/netty/issues/2254 if (!readPending && !config.isAutoRead()) { // 若读操作完毕,且没有配置自动读,则选择Key兴趣集中移除读操作事件。 removeReadOp(); } } }
// Check if this handler was removed before continuing with decoding. // If it was removed, it is not safe to continue to operate on the buffer. // // See: // - https://github.com/netty/netty/issues/4635 // 如果当前上下文已经被移除了,则不能继续操作 if (ctx.isRemoved()) { break; } } // 获取字节容器的可读字节数 int oldInputLength = in.readableBytes(); // 把消息容byteBuf in读取到对象out中,也就是在这里调用我们的子类方法。 decodeRemovalReentryProtection(ctx, in, out);
// Check if this handler was removed before continuing the loop. // If it was removed, it is not safe to continue to operate on the buffer. // // See https://github.com/netty/netty/issues/1664 if (ctx.isRemoved()) { break; } if (out.isEmpty()) { // 如果当前out中没有数据,说明解码失败,无需继续 if (oldInputLength == in.readableBytes()) { break; } else { continue; } }
if (oldInputLength == in.readableBytes()) { thrownew DecoderException( StringUtil.simpleClassName(getClass()) + ".decode() did not read anything but decoded a message."); } // 如果只是进行一次解码,直接退出。 if (isSingleDecode()) { break; } } } catch (DecoderException e) { throw e; } catch (Exception cause) { thrownew DecoderException(cause); } }
@Override publicvoidexceptionCaught(ChannelHandlerContext ctx, Throwable cause){ // Close the connection when an exception is raised. cause.printStackTrace(); ctx.close(); } }
// 找到下一个实现wirte方法的outboudHandler final AbstractChannelHandlerContext next = findContextOutbound(flush ? (MASK_WRITE | MASK_FLUSH) : MASK_WRITE); // 记录当前对象访问位置(咱也不知道这是为啥) final Object m = pipeline.touch(msg, next); EventExecutor executor = next.executor(); if (executor.inEventLoop()) { if (flush) { // 如果当前要直接flush,调用invokeWriteAndFlush直接写入socket next.invokeWriteAndFlush(m, promise); } else { // 否则写入channelOutBoundBuffer中 next.invokeWrite(m, promise); } } else { // 如果当前线程不是eventLoop线程,创建写任务task,并将task丢入到eventLoop的task队列中执行。 final WriteTask task = WriteTask.newInstance(next, m, promise, flush); if (!safeExecute(executor, task, promise, m, !flush)) { // We failed to submit the WriteTask. We need to cancel it so we decrement the pending bytes // and put it back in the Recycler for re-use later. // // See https://github.com/netty/netty/issues/8343. // 提交任务失败,任务取消。 task.cancel(); } } }
// 获取当前的outboundBuffer ChannelOutboundBuffer outboundBuffer = this.outboundBuffer; if (outboundBuffer == null) { try { // 如果当前的outboundBuffer为null的话,直接调用释放当前byteBuf // release message now to prevent resource-leak ReferenceCountUtil.release(msg); } finally { // If the outboundBuffer is null we know the channel was closed and so // need to fail the future right away. If it is not null the handling of the rest // will be done in flush0() // See https://github.com/netty/netty/issues/2362 // 设置promise写失败 safeSetFailure(promise, newClosedChannelException(initialCloseCause, "write(Object, ChannelPromise)")); } return; }
//io.netty.channel.ChannelOutboundBuffer#addFlush publicvoidaddFlush(){ // There is no need to process all entries if there was already a flush before and no new messages // where added in the meantime. // See https://github.com/netty/netty/issues/2577 // 移动链表中entry的操作,表明某个之前的数据需要被处理。 Entry entry = unflushedEntry; if (entry != null) { if (flushedEntry == null) { // there is no flushedEntry yet, so start with the entry flushedEntry = entry; } do { // 统计要flush的entry的个数。 flushed ++; // 设置这些即将被flush的entry状态为uncancelable(不可取消状态)。 if (!entry.promise.setUncancellable()) { // 如果当前entry已经取消了,释放entry的内存,并且减小channelOutboundBuffer大小并触发后续事件。 // Was cancelled so make sure we free up memory and notify about the freed bytes int pending = entry.cancel(); decrementPendingOutboundBytes(pending, false, true); } entry = entry.next; } while (entry != null);
// All flushed so reset unflushedEntry unflushedEntry = null; } }
//io.netty.channel.AbstractChannel.AbstractUnsafe#flush0 protectedvoidflush0(){ if (inFlush0) { // Avoid re-entrance return; }
final ChannelOutboundBuffer outboundBuffer = this.outboundBuffer; if (outboundBuffer == null || outboundBuffer.isEmpty()) { return; }
inFlush0 = true;
// Mark all pending write requests as failure if the channel is inactive. if (!isActive()) { // 如果当前通道已经关闭了,异常处理即可。 try { // Check if we need to generate the exception at all. if (!outboundBuffer.isEmpty()) { if (isOpen()) { outboundBuffer.failFlushed(new NotYetConnectedException(), true); } else { // Do not trigger channelWritabilityChanged because the channel is closed already. outboundBuffer.failFlushed(newClosedChannelException(initialCloseCause, "flush0()"), false); } } } finally { inFlush0 = false; } return; }
//io.netty.channel.socket.nio.NioSocketChannel#doWrite @Override protectedvoiddoWrite(ChannelOutboundBuffer in)throws Exception { SocketChannel ch = javaChannel(); int writeSpinCount = config().getWriteSpinCount(); do { if (in.isEmpty()) { // All written so clear OP_WRITE clearOpWrite(); // Directly return here so incompleteWrite(...) is not called. return; }
// Ensure the pending writes are made of ByteBufs only. // 确保挂起的写入数据仅由byteBuf组成。 int maxBytesPerGatheringWrite = ((NioSocketChannelConfig) config).getMaxBytesPerGatheringWrite(); // 为entry创建byteBuffer数组 ByteBuffer[] nioBuffers = in.nioBuffers(1024, maxBytesPerGatheringWrite); int nioBufferCnt = in.nioBufferCount();
// Always use nioBuffers() to workaround data-corruption. // See https://github.com/netty/netty/issues/2761 switch (nioBufferCnt) { case0: // 没有enrty数据需要处理。 // We have something else beside ByteBuffers to write so fallback to normal writes. writeSpinCount -= doWrite0(in); break; case1: { // 只有一个entry数据需要处理。 // Only one ByteBuf so use non-gathering write // Zero length buffers are not added to nioBuffers by ChannelOutboundBuffer, so there is no need // to check if the total size of all the buffers is non-zero. // 取出第一个bytebufer ByteBuffer buffer = nioBuffers[0]; int attemptedBytes = buffer.remaining(); finalint localWrittenBytes = ch.write(buffer); if (localWrittenBytes <= 0) { // 写入没有完成,后续以eventLoop的task任务形式执行。 incompleteWrite(true); return; } // 调整自适应写,批量写数据时,如果尝试写的都写进去了,接下来会尝试写更多 adjustMaxBytesPerGatheringWrite(attemptedBytes, localWrittenBytes, maxBytesPerGatheringWrite); // 移除已经写入的entry,并更新bytebuf的读索引。 in.removeBytes(localWrittenBytes); // 减少连续写次数,默认16次。 --writeSpinCount; break; } default: { // Zero length buffers are not added to nioBuffers by ChannelOutboundBuffer, so there is no need // to check if the total size of all the buffers is non-zero. // We limit the max amount to int above so cast is safe // 多个entry数据需要处理。 long attemptedBytes = in.nioBufferSize(); // 将数据写入socket finallong localWrittenBytes = ch.write(nioBuffers, 0, nioBufferCnt); if (localWrittenBytes <= 0) { // 写入没有完成,后续以eventLoop的task任务形式执行。 incompleteWrite(true); return; } // Casting to int is safe because we limit the total amount of data in the nioBuffers to int above. // 调整自适应写,批量写数据时,如果尝试写的都写进去了,接下来会尝试写更多 adjustMaxBytesPerGatheringWrite((int) attemptedBytes, (int) localWrittenBytes, maxBytesPerGatheringWrite); // 移除已经写入的entry,并更新bytebuf的读索引。 in.removeBytes(localWrittenBytes); // 减少连续写次数,默认16次。 --writeSpinCount; break; } } } while (writeSpinCount > 0); // 因为连续写入16次,不能保证所有数据都会写完,如果存在后续任务以eventLoop的task任务形式执行。 incompleteWrite(writeSpinCount < 0); }
//io.netty.channel.nio.AbstractNioByteChannel#incompleteWrite protectedfinalvoidincompleteWrite(boolean setOpWrite){ // Did not write completely. if (setOpWrite) { // 当前写socket时返回值小于写入长度甚至返回0,表示有数据积压,此时应该注册write事件, // 待所有数据写后没有数据可写时,取消write事件并注册read事件 setOpWrite(); } else { // It is possible that we have set the write OP, woken up by NIO because the socket is writable, and then // use our write quantum. In this case we no longer want to set the write OP because the socket is still // writable (as far as we know). We will find out next time we attempt to write if the socket is writable // and set the write OP if necessary. // 清除op_write事件 clearOpWrite();
// Schedule flush again later so other tasks can be picked up in the meantime eventLoop().execute(flushTask); } }
//io.netty.example.echo.EchoEncoder publicclassEchoEncoderextendsMessageToByteEncoder<Object> { /** * Encode a message into a {@link ByteBuf}. This method will be called for each written message that can be handled * by this encoder. * * @param ctx the {@link ChannelHandlerContext} which this {@link MessageToByteEncoder} belongs to * @param msg the message to encode * @param out the {@link ByteBuf} into which the encoded message will be written * @throws Exception is thrown if an error occurs */ @Override protectedvoidencode(ChannelHandlerContext ctx, Object msg, ByteBuf out)throws Exception { // 自定义编码方法很简单,先发送数据长度,再发送数据byte数据/ out.writeInt(msg.toString().length()); out.writeBytes(msg.toString().getBytes(CharsetUtil.UTF_8)); } }
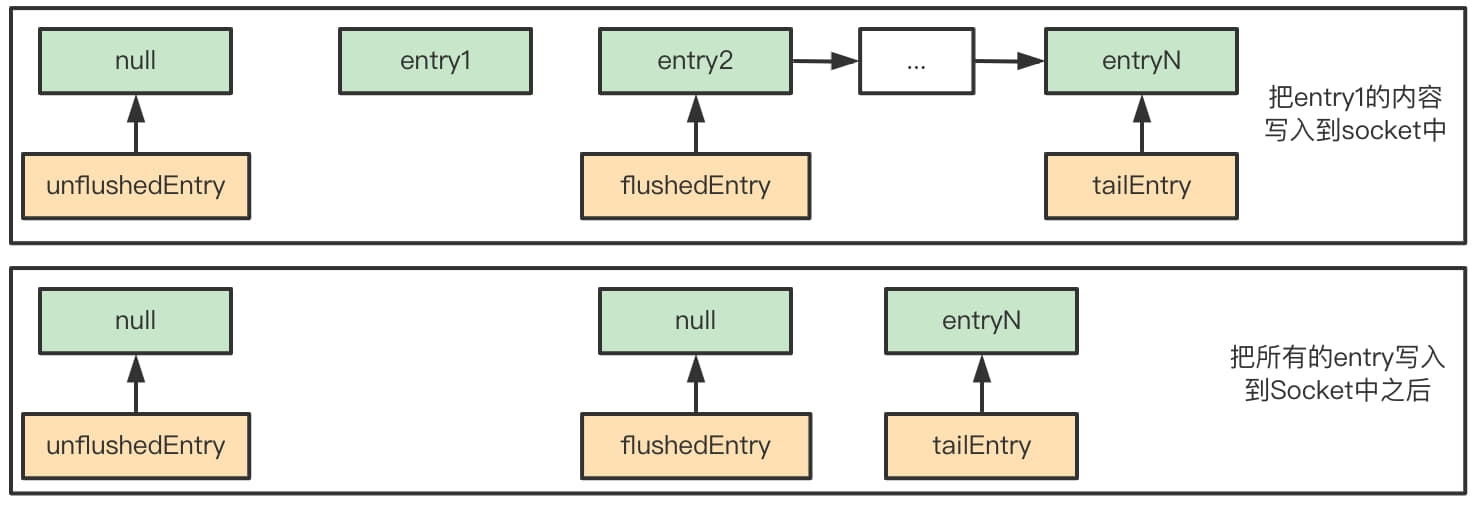
// Entry(flushedEntry) --> ... Entry(unflushedEntry) --> ... Entry(tailEntry) // // The Entry that is the first in the linked-list structure that was flushed // 链表中被刷新的第一个元素,此元素准备第一个写入Socket private Entry flushedEntry; // The Entry which is the first unflushed in the linked-list structure //链表中的第一个未刷新的元素 // 当调用addMessage()方法后,从原链表tailEntry到Entry(现链表的tailEntry)节点 // 都是未被刷新的数据 private Entry unflushedEntry; // The Entry which represents the tail of the buffer // 链表末尾节点。 private Entry tailEntry; // The number of flushed entries that are not written yet // 表示已经刷新但还没写到socket中的entry数量 privateint flushed; //每新增一个Entry,其大小要加上Entry实例的大小(96B)和真实数据的大小。 @SuppressWarnings("UnusedDeclaration") privatevolatilelong totalPendingSize;
/** * Add a flush to this {@link ChannelOutboundBuffer}. This means all previous added messages are marked as flushed * and so you will be able to handle them. * 将前面所有的消息标识为flushed。 */ //io.netty.channel.ChannelOutboundBuffer#addFlush publicvoidaddFlush(){ // There is no need to process all entries if there was already a flush before and no new messages // where added in the meantime. // // See https://github.com/netty/netty/issues/2577 // // 获取当前未flush的第一个entry Entry entry = unflushedEntry; if (entry != null) { if (flushedEntry == null) { // there is no flushedEntry yet, so start with the entry // 如果当前flushedEntry指针没有指向任何数据,指向未flush的第一个entry flushedEntry = entry; } // 从unflushedEntry开始循环设置,将这些全部设置不可取消(uncancel)状态,全部加入到flushed链表中。 do { flushed ++; if (!entry.promise.setUncancellable()) { // 设置失败是因为当前entry已经是取消状态的了 // Was cancelled so make sure we free up memory and notify about the freed bytes int pending = entry.cancel(); // 返回当前entry的size并调用下面方法进行释放对应的大小, // 如果缓存总数据的大小小于低水位,触发fireChannelWritabilityChanged事件 decrementPendingOutboundBytes(pending, false, true); } // 继续下一个entry entry = entry.next; } while (entry != null);
// All flushed so reset unflushedEntry //因为所有的entry都被加入到flushed链表中,所以设置unflushedEntry设置为null。 // 下一次添加数据时,unflushedEntry为最先添加的entry。 unflushedEntry = null; } }
//io.netty.channel.ChannelOutboundBuffer#nioBuffers(int, long) // 在发送数据时需要把ChannelOutboundBuffer中的msg转换成ByteBuffer public ByteBuffer[] nioBuffers(int maxCount, long maxBytes) { assert maxCount > 0; assert maxBytes > 0; long nioBufferSize = 0; int nioBufferCount = 0; final InternalThreadLocalMap threadLocalMap = InternalThreadLocalMap.get(); // 从线程本地缓存中获取ByteBuffer数组 ByteBuffer[] nioBuffers = NIO_BUFFERS.get(threadLocalMap); // 从准备第一个写入Socket的元素开始 Entry entry = flushedEntry; //循环遍历entry,entry必须为准备写入Socket的元素且为非取消状态 while (isFlushedEntry(entry) && entry.msg instanceof ByteBuf) { if (!entry.cancelled) { // 获取entry节点中实际发送的数据 ByteBuf buf = (ByteBuf) entry.msg; finalint readerIndex = buf.readerIndex(); // 获取可发送字节数 finalint readableBytes = buf.writerIndex() - readerIndex; // 若可发送字节数 > 0 时,否则跳过 if (readableBytes > 0) { // 累计发送字节不能大于maxBytes if (maxBytes - readableBytes < nioBufferSize && nioBufferCount != 0) { // If the nioBufferSize + readableBytes will overflow maxBytes, and there is at least one entry // we stop populate the ByteBuffer array. This is done for 2 reasons: // 1. bsd/osx don't allow to write more bytes then Integer.MAX_VALUE with one writev(...) call // and so will return 'EINVAL', which will raise an IOException. On Linux it may work depending // on the architecture and kernel but to be safe we also enforce the limit here. // 2. There is no sense in putting more data in the array than is likely to be accepted by the // OS. // // See also: // - https://www.freebsd.org/cgi/man.cgi?query=write&sektion=2 // - https://linux.die.net//man/2/writev break; } // 累计发送字节数 nioBufferSize += readableBytes; // 获取entry中byteBuffer的个数 int count = entry.count; if (count == -1) { //noinspection ConstantValueVariableUse entry.count = count = buf.nioBufferCount(); } // 需要多少个byteBuffer int neededSpace = min(maxCount, nioBufferCount + count); // nioBuffers长度不够,需要扩容。 if (neededSpace > nioBuffers.length) { nioBuffers = expandNioBufferArray(nioBuffers, neededSpace, nioBufferCount); NIO_BUFFERS.set(threadLocalMap, nioBuffers); } // 如果ByteBuffer的个数为1,则直接获取ByteBuffer并放入nioBuffers数组中。 if (count == 1) { ByteBuffer nioBuf = entry.buf; if (nioBuf == null) { // cache ByteBuffer as it may need to create a new ByteBuffer instance if its a // derived buffer entry.buf = nioBuf = buf.internalNioBuffer(readerIndex, readableBytes); } nioBuffers[nioBufferCount++] = nioBuf; } else { // 如果有多个循环获取ByteBuffer放入nioBuffers数组中。 // The code exists in an extra method to ensure the method is not too big to inline as this // branch is not very likely to get hit very frequently. nioBufferCount = nioBuffers(entry, buf, nioBuffers, nioBufferCount, maxCount); } // 不能超过最大个数限制 if (nioBufferCount >= maxCount) { break; } } } // 获取下一个节点 entry = entry.next; } this.nioBufferCount = nioBufferCount; this.nioBufferSize = nioBufferSize;
/** * Removes the fully written entries and update the reader index of the partially written entry. * This operation assumes all messages in this buffer is {@link ByteBuf}. */ //io.netty.channel.ChannelOutboundBuffer#removeBytes publicvoidremoveBytes(long writtenBytes){ for (;;) { // 与nioBuffers()方法一样,从准备写入socket的节点开始获取此节点的buf数据 Object msg = current(); if (!(msg instanceof ByteBuf)) { assert writtenBytes == 0; break; }
if (!e.cancelled) { // entry在uncancel的状态下执行到了这里。 // only release message, notify and decrement if it was not canceled before. // entry数据已经写入到socket发送出去了,释放内存空间。 ReferenceCountUtil.safeRelease(msg); // 通知处理成功 safeSuccess(promise); // 减少当前outbundBuffer中数据对应的大小。 decrementPendingOutboundBytes(size, false, true); }
// recycle the entry // 回收entry对象并放回对象池。 e.recycle();
//io.netty.channel.socket.nio.NioSocketChannel.NioSocketChannelConfig#calculateMaxBytesPerGatheringWrite privatevoidcalculateMaxBytesPerGatheringWrite(){ // Multiply by 2 to give some extra space in case the OS can process write data faster than we can provide. // 最大可写字节数设置为sendBufferSize * 2,乘以2可以留出一些额外的空间,以防操作系统处理写数据的速度比我们提供的快 int newSendBufferSize = getSendBufferSize() << 1; if (newSendBufferSize > 0) { // 设置最大可写字节数。 setMaxBytesPerGatheringWrite(newSendBufferSize); } }
//io.netty.channel.socket.nio.NioSocketChannel#doWrite中的代码片段 default: { // Zero length buffers are not added to nioBuffers by ChannelOutboundBuffer, so there is no need // to check if the total size of all the buffers is non-zero. // We limit the max amount to int above so cast is safe long attemptedBytes = in.nioBufferSize(); finallong localWrittenBytes = ch.write(nioBuffers, 0, nioBufferCnt); if (localWrittenBytes <= 0) { incompleteWrite(true); return; } // Casting to int is safe because we limit the total amount of data in the nioBuffers to int above. // 根据实际写入的数据量来调整最大可写字节数 adjustMaxBytesPerGatheringWrite((int) attemptedBytes, (int) localWrittenBytes, maxBytesPerGatheringWrite); in.removeBytes(localWrittenBytes); --writeSpinCount; break; }
// io.netty.channel.socket.nio.NioSocketChannel#adjustMaxBytesPerGatheringWrite privatevoidadjustMaxBytesPerGatheringWrite(int attempted, int written, int oldMaxBytesPerGatheringWrite){ // By default we track the SO_SNDBUF when ever it is explicitly set. However some OSes may dynamically change // SO_SNDBUF (and other characteristics that determine how much data can be written at once) so we should try // make a best effort to adjust as OS behavior changes. // 判断是否所有字节都写入socket中发送 if (attempted == written) { //如果本次写入所有字节数都写入socket中 if (attempted << 1 > oldMaxBytesPerGatheringWrite) { // 写入字节数 * 2 大于设置的可以写入的最大字节数,则更新可写入最大字节数为写入字节数 * 2 ((NioSocketChannelConfig) config).setMaxBytesPerGatheringWrite(attempted << 1); } } elseif (attempted > MAX_BYTES_PER_GATHERING_WRITE_ATTEMPTED_LOW_THRESHOLD && written < attempted >>> 1) { // 本次写入并不是所有字节都写入socket中 // 那么如果尝试写入的字节数比最大可写入字节的的最小阈值(可以理解为最小的写入最大值上限),并且写入的值小于尝试写入字节数/2 // 将最大可写入字节数 / 2,按照写入时的网络情况,设置的最大可写入字节数仍然大于实际可写入字节数, // 即使降低最大可写字节数仍然可以充分利用网络资源。 ((NioSocketChannelConfig) config).setMaxBytesPerGatheringWrite(attempted >>> 1); } }
//io.netty.channel.socket.nio.NioSocketChannel#doWrite @Override protectedvoiddoWrite(ChannelOutboundBuffer in)throws Exception { SocketChannel ch = javaChannel(); int writeSpinCount = config().getWriteSpinCount(); do { ... write to socekt logical ... --writeSpinCount; ... write to socekt logical ... } while (writeSpinCount > 0);
// 未完成的写操作 incompleteWrite(writeSpinCount < 0); }
//io.netty.channel.nio.AbstractNioByteChannel#incompleteWrite protectedfinalvoidincompleteWrite(boolean setOpWrite){ // Did not write completely. if (setOpWrite) { // 设置OP_WRITE事件。 setOpWrite(); } else { // It is possible that we have set the write OP, woken up by NIO because the socket is writable, and then // use our write quantum. In this case we no longer want to set the write OP because the socket is still // writable (as far as we know). We will find out next time we attempt to write if the socket is writable // and set the write OP if necessary. // 清空OP_WRITE事件标识 clearOpWrite();
// Schedule flush again later so other tasks can be picked up in the meantime // 使用eventLoop的task方式执行后续写操作。 eventLoop().execute(flushTask); } }